Friday, December 22, 2006

A Hole in the Wall

We are going to visit my spouse's family in Montana this Xmas. Thing is, there's this big hole in our exterior wall.

We'd hoped to be finished with the framing in this area before Xmas, but that didn't happen. We both got sick (and busy). In order to feel more comfortable leaving for the weekend, we boarded up the hole with 2 pieces of 4'x8' 5/8ths plywood sheathing (that we will reuse during the framing process). We also stapled some plastic over the plywood to protect it.

We should have done this days ago. Very ghetto.

Thursday, December 21, 2006

Jingle Bell Rock

This first photo is for everyone who wonders about rain in Seattle. My brother-in-law left the wheel barrow out (we usually keep it under the carport) after his visit at Thanksgiving. If you remember, it snowed a lot right after Thanksgiving so we didn't bother to move the wheel barrow. This photo shows the wheel barrow three weeks later. The snow and additional rain have filled it right up. At night, the water in the barrow often freezes solid, though lately it's only been skinning over. I dumped it today (through the fence into the neighbor's lot). His grass and trees needed the extra water. They looked parched.

As my spouse mentioned in the previous post, we scored some rock. One of the landscape contractors that I work with (I work for a landscape architect) is moving his yard and offered me first choice on some of the crap he doesn't want and doesn't want to move. He knows that my spouse and I have a fixer-upper and is a really nice guy. Mostly what he has is a lot of stone left over from old projects. What's the one thing nobody wants to move... that's right... heavy stuff. I've always hated carrying boxes of books when I've moved and I think landscape contractors must feel twice as strongly about stone.

My spouse and I were in the area and drove by to take a look. There sure was a lot of nice stone. We were a little hesitant since stone is heavy and the most we feel comfortable loading up my spouse's truck with is about a half ton. The contractor could sense our desire for the stone as well as our hesitation. He said we could use his company truck if we wanted. Wow! Now we couldn't refuse. The truck is one of those Isuzu NPRs that are the workhorses of small companies. This one even has a dump truck feature. Double wow! We said we'd come by the next day and take as much as we could.

This all happened during the weekend that we were living at our friends' place in West Seattle (due to lack of electricity everywhere else). My spouse wasn't feeling 100% so I was on my own. I called up a friend who had said that he likes hard manual labor and convinced him to come and help me move rock. Loading the stone was time consuming. We could only carry 2 to 3 rocks at a time. In the end, we were able to get about 4 tons of stone into the truck before we just couldn't motivate ourselves anymore. The stone is of three different varieties: gray with orange highlights, gray with purple highlights, and gray with brown highlights (sorry, I don't know the names of the varieties). They look like basalt.

Here's photo of N-friend at our house about to be crushed by the stone. Watch out!

Actually, I was planning on stacking the stone on pallets at our house. N-friend said to me that it sure would be nice if we could dump the rock in the driveway instead of unloading the truck by hand (he didn't know about the dump feature on the truck). At first I was hesitant because I didn't want the rocks to break apart but after moving a couple of rocks by hand, I fessed up that there was a dump feature and that we should use it. N-friend was nice enough to take some photos of the process.


The stone just wouldn't slide out of the truck bed at first. Finally after lifting the dump bed almost as far as it would go, some of the rock slid out. At little more lift and the rest slid. I had to drive the truck forward a little to allow the rocks to have a place to fall since they were piling up on one another. Using the dump truck made me feel so professional. Kind of like I knew what I was doing.

Here's a photo of the pile of stone (as well as the empty pallets). The pile is a lot bigger than the picture makes it look.

Our plans for the stone is to build a column at the end of our driveway to mount our house address on as well as to build a small planter wall along the edge of the driveway. The planter will be primarily for a hedge that we are going to plant so as to separate our driveway from NE 146th Street (seen in the above photo just beyond the stone pile and red truck). Our nice neighbor on the other side of 146th is going to contribute to the hedge fund. Should be nice in the end. Here's a concept of what our driveway entry might look like.

After dropping off the stone at my house, we when back to the landscaper's yard and N-friend got some flagstone for his backyard. We went through the same process of loading the stone and dumping it. I've offered to help him install the flagstone when he has time (which will likely be in the spring sometime).

Happy Solstice!

Sunday, December 17, 2006

Windy Shitty

Excuse the language, but it's the way we feel.

So, in case you haven't heard, our area got hit with winds around 93 mph on Thursday night. We got curtains of rain. So much rain that water was squirting up in the air, 4 feet up into the air, through storm drains. Not pretty. We've had really weird weather this year. First there was the snow storm, and now this weird week of wind. I was home sick, so I missed the flooding on Thursday night, but my spouse came home SOAKED from picking up a movie. His clothes were totally saturated, and he had only been outside for a moment or two. Anyway, the power went out late Thursday night/Friday morning. No power = no heat. Which would have been okay, had we a fireplace. Or, you know, WALLS. The temperature dropped very quickly on Friday. My place of work was open, but I was still sick. A friend called around noon and invited us to her place in a different part of the area. She still had power. Bless her heart! She and her husband, good friends of ours, took us in (we're still staying with them - still no power). Special thanks to them for providing us with heat, hot showers, a good bed, and wonderful company.

It's funny how much we miss the rat hole. As crappy as it is, it's still our home.

Also because of the wind, my brother didn't end up getting to come into town this weekend. The radar at the airport went down, and so his flight got cancelled. And he rescheduled. And it got cancelled again. So he gave up. No brother for me this week, and no huge push on work on the rat hole. *sigh* That means we gotta wait until after the new year to break down the old walls and put in the new.

In the meantime, we got rock. Mmmm. Good rock. My spouse will write more about that later, with pictures. Yay pictures!

The "bad" news: No damage was done to the icky house in front of us in the windstorm. The good news: our house didn't get damaged at all, either.

Monday, December 11, 2006

Monstrosity Update

No, I'm not talking about our house. Our house is the rat hole, not the monstrosity. ^_^

So, the horrible house (the monstrosity) in front of ours is finally on the market. It has been on the market over the past few weeks, but it wasn't really ready to be shown. The agent had an open house this weekend, and I only saw one family show up. I made sure to sit in the nook, dressed in my red bathrobe with messy hair, and stared at them whenever they looked my way. It was a good time. We're hoping that our blue tarp, tires, and piles of broken concrete in the front yard help the property values. Part of me wants to do worse things, like make sure I'm walking around naked, or pretend to have screaming fights with my spouse and throw bottles against our fence so they shatter, but I just can't bring myself to do it. Plus it's too cold and I'm too busy. Heh.

Here's a link:
Kenmore Area Home in Kenmore (I kid you not)

In other news, the old guy that used to own the house, the one that lived here for so many decades and had the train set, stopped by and chatted with one of our neighbors. According to the neighbor, the previous owner said he liked the house "better before the other one was built." Apparently he used stronger language than that, but the neighbor was too nice to repeat it. At any rate, it was neat that he stopped by the neighborhood, even if neither of us got to visit with him. It just reinforces the community consensus that the new house is not a good addition to our neighborhood.

We were way too busy last week and this weekend to do any additional work on the house, although we're still feeling triumphant about the beam. It's so much nicer in there! My brother's coming out again next Friday and will be here until Christmas in order to help us out. The plan is this: knock out the remaining walls, reframe, put up plywood, and install windows. We probably won't get the sliding doors installed, but that's okay. We'll just nail up wood in the meantime. That way the house will be closed up when we go visit my family for the holidays. Then, when we return, we'll be in good shape to reframe the rest of the room, put in the other beam, and then we can get the framing inspected. If it passes, it's on to the next part - installing electricity, and that means heat, glorious heat. It won't be in time for the holidays, but the fact that it's on the horizon is enough for me.

Monday, December 04, 2006

Beam Saga Finale

It's been getting cold here. Sometimes the windows ice up. Here's a photo of the kitchen window above the sink from one morning last week.

Despite the cold, we've been moving forward with our construction efforts. With the posts in place and the beam in location, we've secured the beam with some Simpson Strong Tie brackets. With the beam secure, we've added 2x4 supports between the beam and the rafters. Before all of this, there were five such supports (though not directly under the rafters). Now that we've rebuilt this area, we've installed eight (one under each rafter). This is a big improvement. With the rafters supported, our makeshift roof supports have come down. Here are 2 photos of the process.

It's absolutely amazing how much better the space feels without the low beam. The higher beam makes the living room space feel very open and unimpeded. Plus, without the makeshift roof supports in the way, it's much easier to get from one side of the room to the other. Here are a couple of photos of the finished beam assembly.

The second photo looks fish-eyed (distorted) because it is. The beam is not warped. In fact, I can hang on the beam and it doesn't flex at all. However, my B-i-L hung on it while he was visiting and he got it to flex, but he's a little bigger than me.

Here's a photo of me not reaching the future location of the finished ceiling. What a big difference the beam relocation makes! We had initially considered leaving the old beam where it was. We are so happy that we decided to replace and lift the beam. The effort has been so worth it.

The ceiling joists will be face mounted to the beam and the drywall boards will be screwed directly to the bottom of those joists and the beam. The next step is to build new roof supports and rebuild the exterior walls so that we can raise the ceiling on the east side of the beam (shown in the "Praise the Beam" photo).

Thursday, November 30, 2006

We Have Cold(er) Feet

We did a bit of work during the week of Thanksgiving. My brother-in-law came to stay with us for a week and, well, we had to keep him entertained as best we could. One of the first things we did was to visit the dump. Actually, we go to the transfer station. It's a lot like the garbage pit/compacter from the first Star Wars movie. B-i-L loaded up my spouse's truck with about a half ton of wood, concrete, and steel pipe debris. Here are a couple of photos (one of B-i-L in the truck at the transfer station, the other of the debris in the "trench-of-death".

On the day before Turkey day, a friend of my spouse's dropped by for a visit. B-i-L and I had already taken out the 2x4s in one of the locations where we needed to install a new post (to support the beam) so Mr. S helped me install the new post and nail it in place. Here are a couple of photos (one is a before shot, the other is Mr. S posing with the new post).

Like any good construction team, we spent a lot of time making sure one person was working while the others offered suggestions and made sure most safety measures were being adhered to. The second post location required lots of conversation and it was very entertaining.

Turkey day was very nice. A couple of months ago, we were eager to have Thanksgiving at our house. A week ago or so, some friends talked some sense into us and got us to come over to their place for Thanksgiving. So we packed up and cooked over there. It sure was a lot warmer in a house with a ceiling.

With all the company in town though, we couldn't help but take advantage. Mr. S was coming over on Black Friday so B-i-L and I decided to get a head start and attacked the second post location. To get at it we had to blow a hole in the outer wall and remove the windows in that area.

Our demo work was a little on the surgical side since we didn't want to add to any structural problems. We found that the windows weren't really fastened to the frame of the house. They were just floating in the openings with an awful lot of hardened putty around the edges to keep them from falling out. We guess we don't really know if this is the way windows were supposed to be installed back in the old days (1980 or so), but it doesn't seem like the best way to do it if you ask us.

We found a little wood damage under where the post was going to be placed, chiseled out the area and added a piece of good wood to fill the void.

We used some of the original cedar 2x4 material to bridge the area both on bottom and at the top where the post and beam will be set. We have to do this area first so that we can support the roof with the beam before we blow out the rest of the walls (that are also supporting the roof).
With the posts installed, it was time to unwrap and place the beam. Unwrapping the beam was not unlike unwrapping a large candy bar. After placing the beam, B-i-L noticed that the word TOP was stamped on the bottom of the beam. After puzzling over this strange instruction for a while, we flipped the beam over so we couldn't read the confusing word anymore.
With the beam in place, we decided to call it a day. Nailing the beam in place could happen the next day. We tapped plastic over the outside and inside of the hole. It's a little colder in the house now, especially since it started snowing. It's noisier and draftier, too.
I've taped all the air leaks in my office space (which has been sealed off from the living room with plastic for months now). I've also started wearing my sleeping bag while I work at my computer. That, plus my little space heater, keeps me pretty toasty during the day while I work. We've taped off the nook as well (where we are keeping our plants). There's a heater in there and the plants seem happy enough.

Monday, November 27, 2006

White Thanksgiving

It snowed on the Saturday after Thanksgiving. Not a lot, but enough to be noticed. It had hailed on the Tuesday before Thanksgiving so we guess the snow shouldn't have been a huge surprise. The first snow melted very quickly.

On the Sunday after Thanksgiving, it snowed a lot! 3-4 inches and it stuck. It's supposed to snow again today/Monday (2 inches) and we're already starting to see a few flurries.

The reason it is snowing is that we pierced the protective membrane that we usually refer to as "house" on Friday. We installed the posts to support the beam and that required blowing out the windows and wall in that area. More on this later.

Monday, November 13, 2006

Doing our Part

The house on the front lot has finally been listed so we picked up one of the fliers. The box is crammed full and they are kind of moist and wrinkled. They're also kind of hard to get out. Since we love our neighboring developer so much, we decided to help him advertise by posting a copy of the flier on our blog. Here it is. Enough said. Enjoy!

Note the exclamation points. The 7400 sq ft lot size is especially appealing. 7400 sq ft is about as small of a lot as a developer can build a house on. Exclamation point indeed!

Thursday, November 09, 2006

It's not Weed, it's Grass

Out of the corner of my eye, I get a sense that something is different. I look to my left and stare at the "lawn". It doesn't look any different. But something is different. There's a very subtle verticality about the micro-texture. I walk over and stare some more. I still can't really tell if I'm seeing anything that would make our "lawn" more than a washed out, pine needle covered dirt pile. Then I see it. I bend down and when the sun is just right (yeah, what sun), I can see tiny grass shoots poking up.

We can't believe it! Grass! There are little shoots pushing up here and there all across the lawn. My mom was worried that the rain would wash everything away. But there it is. Grass. It will be interesting to see how patchy the grass comes in. Good thing we have a decent macro mode on the camera because there is no way we could have taken a decent picture from 12 inches away. We had to get 3 inches away to see the grass.

Here's another photo of grass. We think that this grass is not from seed but from old grass root left over from the old "lawn".

Wednesday, November 08, 2006

Rain Drain

So, in the midst of all our beam fun, it was raining like crazy here. Historically, the average for November is 5 inches. For the entire month. So far this month, we had at least 8 inches. Rivers have flooded, towns have been evacuated, and much has washed away.

BUT NOT US! Mwa ha ha ha ha!! My spouse checked on the crawlspace yesterday morning, in the midst of the rain. What did he find? Nothing! The crawlspace was dry. That means that either the drain we installed is working or the rain was mystically being absorbed by our crappy clay soil. I prefer to think the former. We'll see as winter wears on and we get hammered time and time again by storms.

High Beams

Now that we're done with the lawn, it's time to spend some more time inside. The big roof supporting beam is the next thing to deal with (obviously). The thing is too low, ugly, and it's even sagging a little bit. We are going to replace it with an engineered beam (called a Glulam beam). A Glulam beam is really nothing more that a bunch of 2x4's laminated together. Big deal.

In order to remove and replace the old beam, we have to remove the rest of the 2x4's that make up the ceiling (as well as some of the old logs that made up the old, old roof). After we did that, we had to remove the old chimney. We had a hard time figuring out how to do this. We were particularly afraid of all the old soot that we suspected was in it so we duct-taped every seam and hole we could find. Still unable to see how to remove it, we tried using the sawzall and the tin-snips. Not really getting very far and in fact just mangling the chimney, we finally held our breath and pulled the thing apart. Easy! And not a big mess either (thanks to the tape).

Here are pictures of the chimney before and after. My spouse had the brilliant idea of hanging a light in the space so we could see. It works! You might notice a yellow string in the photos. There was already a small leak in the chimney area and our messing with the chimney only made it bigger. The string is to guide the drip into the bucket and keep in from wandering down the rafters. We also used a blue tarp on the roof around the chimney to help minimize the leak. We're using the old tire we found in our yard along with some rocks to hold it down. Blue tarps always help with property values (especially when people are trying to sell houses on neighboring lots).

We also had to cut out the old sun-porch roof/ceiling that was sloped. With all that done, we had to build supports for the roof so that when we removed the existing beam the roof didn't cave in on us (we're brave, aren't we). I woke up Saturday morning thinking that if we built the supports, we would never get the new beam in place because the supports would be in the way. The solution was to put the new Glulam beam up in the attic space and build the supports around both beams. The Glulam beam is only a little over 100 pounds so my spouse and I were able to lift it up relatively easily. When we cut out the support 2x4's that ran from the roof to the old beam, only one shifted and sat on the blade of the sawzall. We used a wedge and lifted the roof support up a bit and everything was fine. The roof didn't sag or settle or even cave in! We must have done something right. I hope our luck (and forethought) continues.

Here are before and after photos. It turns out that the 2x4 and logs on top of the old support beam weren't even nailed to it. They just slid off when their ends were cut. To get the old beam down, we put some 2x4 supports under it (in three places). We cut a 4 inch section out of one end so we had some wiggle room. Then we made two more cuts and pulled down the beam in two halves. Wow! It was pretty heavy. We had been considering keeping the beam in one piece but we're really glad that we cut it in half.

The old beam smelled like fir when we cut it. My spouse counted 75 rings and that's just in our beam! It was probably from a very old tree. There were a few pretty deep cracks in it. The wood is really nice and I've been wondering what I should do with it. I could make a jewelery box for my spouse as a surprise (of course, she won't be surprised now that I've blogged it).

Here are the left over ends of the beam at the wall connections. We're really happy to have a sawzall. It's definitely the best demo investment anyone can make.

Here's a photo of the old beam halves on the floor.

Now we have to re-frame the support post locations and install the new Glulam beam. What fun!

Wednesday, November 01, 2006

'Til the End of Lawn

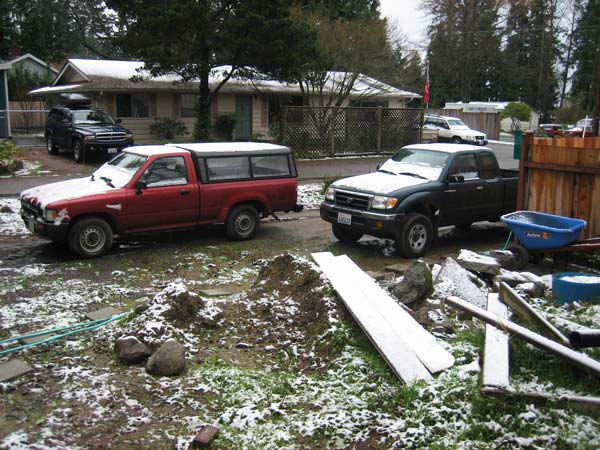
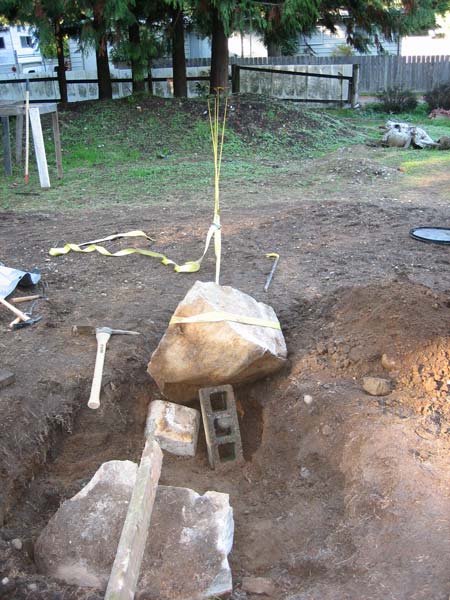
As you may remember, we found a big boulder in our lawn about 1” below grade. We were feeling frisky and thus attacked it. We’ve received lots of advice about this. My father recommended drilling holes and using explosives. Another friend recommended digging a deeper hole and burying it. In the end, I used a jack hammer in an attempt to break the rock into smaller more manageable pieces since not even our trucks would have budged it. I soon found out that a jack hammer is good at finding and exploiting pre-existing fissures but not actually creating them from scratch. I made about 10-15 little dents in the rock before finding (luckily) a hairline crack that I was able to force open. The resulting halves were about a 2/5ths piece and a 3/5ths piece. Still pretty big pieces, though.

My spouse was sick that week so I went at it by myself. I tied off to a tree in the yard and used one of my truck straps as a come along. I guess I was just too lazy to go buy/rent a real come along. I was able to budge the larger rock half a couple of inches at a time. Using a 2x4 and some concrete blocks, I supported and adjusted the rock and eventually got it almost out of the hole. I knew if I just had one more person I could probably roll the rock across and off of the lawn area. I called a friend and he came over with his 21 month old son. Hey, every little bit helps! Together we rolled the boulder half out of the hole and off the lawn (little by little). His son would come over from time to time and help us by pushing and making grunting sounds (not very dissimilar from the sounds we were making). The rest of the time he’d dig in the dirt with a mini pick axe tool.

Working the rock.

Success! (Half-way)

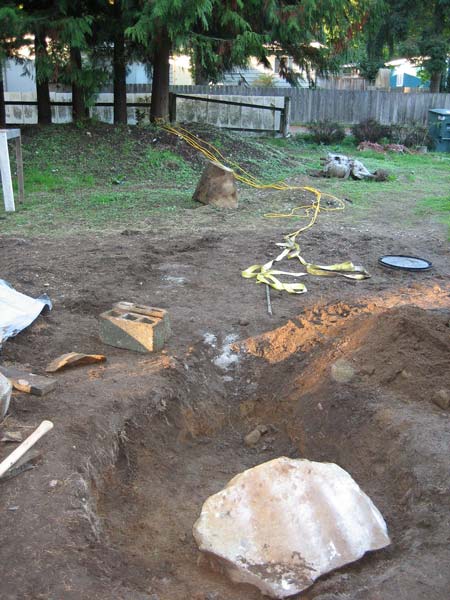
Moving one of the halves was pretty exhausting. I wasn’t really into moving the other half. I decided to bury it. The smaller of the halves now resides 6” below grade in the lawn.

Success! (Out of sight, out of mind)

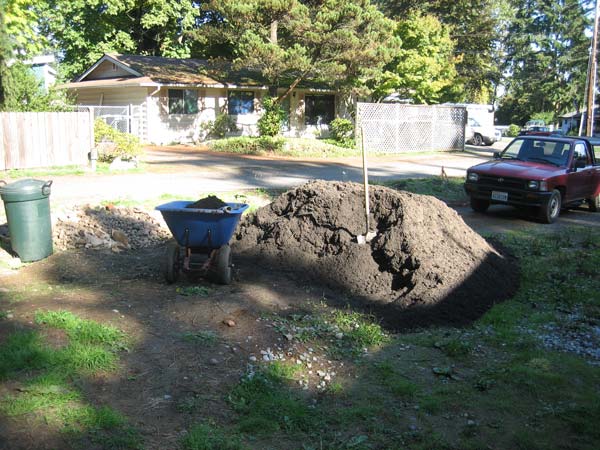
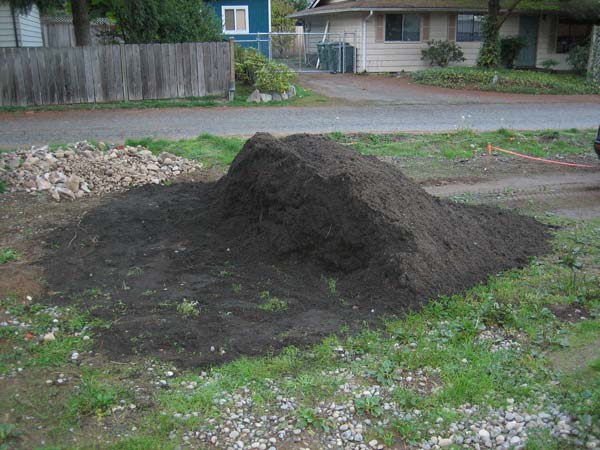
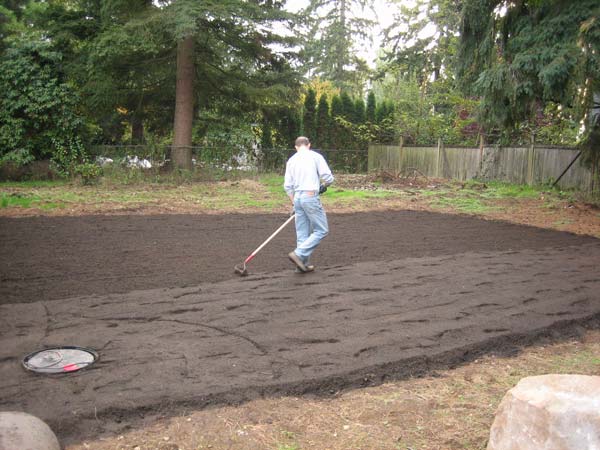
With the lawn clear of boulders and holes, I spread 7 yards of 2-way compost (sand-compost mix) over the approximately 30’ x 30’ area. I had to shovel it, wheel barrow it, then rake it out. My spouse helped rake as well, but she was still sick and didn’t have a lot of endurance.

After spreading it, I tilled the compost to mix it with the already tilled pre-existing “soil” that was under it. After tilling along the x axis and then the y axis, I leveled the area with a rake.

I rented a roller, filled it about one third full of water and gently compacted the soil. After that, I scored the smooth surface with a rake so that the grass seed would have more contact with the soil.

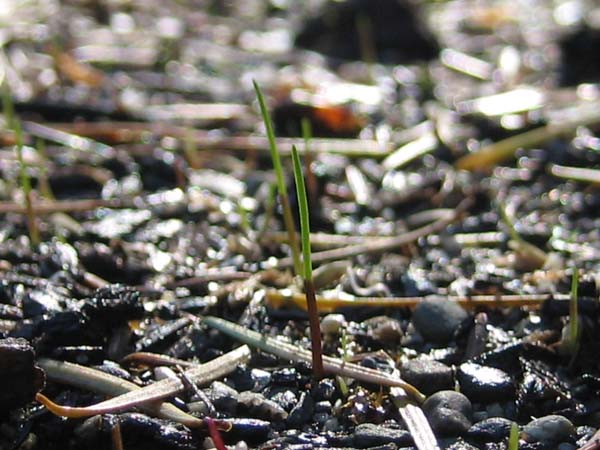
A friend had loaned us a fertilizer spreader and I had already used it to spread some lime before tilling the compost into the soil. Spreading the grass seed was a very touchy process, but I got reasonably even coverage. Finally, I went over the whole area again with the flat side of a leaf rake to gently cover the grass seed. It rained the next day, which was prefect.


Unfortunately, it has gotten quite cold and we haven’t seen any growth yet. We will likely have to seed again in the spring. Until spring though, we’re not messing with the lawn anymore!