Tuesday, October 08, 2013

Fence: Part 6b - Staining Prep

I spent the last week of nice days spraying wood cleaner on 500 pickets (often with a one-year-old on my back). I used a different cleaner on the last third of the pickets and it discolored the wood a little. It doesn't matter since I'm using a solid stain. The point of the cleaning is to remove the the mill glaze (or scale) and open the pores so that the wood absorbs the stain.

Thursday, September 26, 2013

Fence: Part 6a - Staining & Pickets

I hired a Labor Ready guy to come out and spend some time staining the posts and rails last week. He spent four hours and was able to finish the west half of the fence posts and rails. He was about as fast as I was (I stained two posts and three rails a couple of days earlier). It cost $25 an hour.

I'm staining all pieces of the fence prior to assembly so that they are fully covered and there is less chance for rot. I see a lot of fences here in the Pacific Northwest that don't seem to last very long (I'm thinking the rain has something to do with it). The posts warp and break. The rails warp and break at the posts.The pickets warp and fall off the rails.

After the fence is assembled, I'll try to put another coat of stain on the fence as a whole as soon as I can (though, sadly, that may not be until next summer). I'm using a solid stain which is supposed to protect the wood for ten years (though the guy behind the paint desk said that PNW conditions basically cut that in half. 
I used the old fence rails to build the saw horses.

I also decided to add the third screw to the rail brackets. The pickets are soft enough that the screw head pushes into the pickets and everything sits nice and flat.

Since the posts and rails were stained, I started installing the stained pickets as soon as they were dry. The top rail is set at 71" so I have to cut the pickets. Plus, each span from post to post gets shorter from east to west. This means that I have to cut the pickets progressively shorter as I install them (from left to right). This is because I've set the top rail level. If I had set it parallel to the ground (and therefore sloped) all the pickets would be the same length.

I'm installing a 5/4" x 4" cedar top cap along the top of the fence to protect the pickets since if I didn't their end grain would just soak up water for the rest of their existence. And I'm installing a 1" x 4" fascia board to make everything look pretty. The fascia board stock I have is actually 1" x 6" and I tried installing it uncut to see if I liked the look. I didn't so I cut it down, stained the cut, and installed it.
The pickets are spaced 1/16" apart.

Here's the fence from the inside of the yard.

Here's the fence from the outside along the private road.

I'm super excited to have one span done. Only fourteen more to go. And two swing gates. I have someone coming by on Monday to give me a quote on staining the stack of 500 pickets.

Sunday, September 15, 2013

Fence: Materials

Home Depot called and told me I needed to pick up the rest of my fence materials ASAP. I was hoping to use them as my offsite storage yard a while longer, but they want to close the will call ticket. I bought all the materials at once to get a zero interest deal and was told it was okay if I didn't pick up all the materials right away. I guess they expected weeks not months between pick ups. 

It took me most of  Sunday to get the remaining materials. It took two trips and the 500+ pickets maxed out the truck's suspension. I had the Home Depot guys drive a pallet (the pallet held 648 pickets) out to the truck so I didn't have to touch every picket twice. That was awesome. 


Now it's time to stain.

Tuesday, September 03, 2013

Fence: Part 5c - Rails

I finished installing the last of the rails (or stringers) on the new fence on Monday. I'll put on a coat of stain on the posts and rails next. Then I'll stain the pickets before i install them.


I could have just screwed or nailed the rails to the posts, but i chose (as most people do) to use 2x4 stringer brackets. I installed three rails between each pair of posts because of all the warped pickets I've seen on all the fences (in the Pacific NW) with only two rails. I'm hoping the extra rail will help minimize the warping. At the very least, the extra rail will make it easier for my kids to climb the fence.

Here's the screw that I'm using for attaching the brackets to the posts and that I will be using to attach the pickets to the rails. I bought a box of 5000 for a about $100 (about $0.02 per screw). It's pretty awesome! It self-drills, has a really small head, and has a square drive. Plus it's a deck screw so it's weather resistant.


I attached the brackets to the posts allowing for the thickness of the pickets, facia board, and top cap (1/2" from the inside of the fence).

Then I measured and cut the three rails to fit between the posts. the rails were all the same length because the posts were plumb, but I measured anyway. I didn't use screws on the outside of the bracket, only the bottom and inside, because I don't want the pickets to rise as they pass over the bracket. I'm pretty sure the connection is strong enough. I also brushed on some stain on the cut end of the 2x4 to give it additional weather protection.

There was anywhere from 1" to 2.5" of rise from post to post. The total rise along the run of fence is 26.5".

Here are some photos of the return where the big swing gate will eventually be.

Here's a photo of the little fence section that I'm putting at the end of the driveway to receive the address numbers. I'll be cutting the tall post to match the height of the shorter post.

And here's a photo of the garbage can area. I added diagonal braces to stiffen up the posts where the gates will hang. The braces make a HUGE difference!
----------
Here's a photo of the shed my neighbors built last week. They bought a kit and didn't have to cut hardly any of the wood. It's about 8'x12' and about 9' high. The green that they painted it seems to really make it invisible. They cut down the (weed) locust trees that used to be there and that really let a lot more light into the area. I suspect our blueberry bushes will be happier until we move them over to the fence where there is tons of light.

Sunday, August 25, 2013

Fence: Part 5b - Rails

I installed nine sets of rails (stringers) this weekend. This leaves me with seven sets left to install for the main fence.

 The first thing I did was to build a measuring stick/guide so that I could more quickly locate the rail support brackets. It's symmetrical so I can flip it and use it on the right and left side of a post.

 This is where the double gate will go for side road access. I have returns on the fence here to strengthen/stiffen the fence and also to frame the garbage can area. The fence and gates will be six feet tall, but the returns will only be four feet tall. I'll be building a gravel pad in this area for the cans to sit on.

We're going to have to get used to accessing the side road from the new gateway. The old path will just lead to the fence! Until the pickets are installed, though, I guess climbing through the fence will work.

You can probably see the rise in the rails along the road (since all the rails are level). The rise from each post to the next one is two and a half inches.

Sunday, August 11, 2013

Fence: Part 5a - Rails

I bought lumber and brackets today... and I installed the first set of rails! Wow, it's starting to look official!


Most fences in the area are built using two rails, but the pickets all seem to eventually warp, and two rails isn't enough to keep everything in line. Three should keep the fence looking a bit nicer for a while longer.

Fence: Part 4b - Posts

I finished installing that last of the fence posts.

The two posts at the end of the main run needed to be "tuned" so that they would be in line with the rest. There were too many roots in the way to get the stake in line perfectly.

Here's a photo of what I did. I did a big notch and then filled the remainder of the sleeve with a piece of wood that I screwed onto the main post. I may add a little piece to aesthetically fill the notch at the bottom.

I also installed the posts at the end of the driveway. They will be short (finish height to be between 42" and 48") for better visibility. I decided to screw on the reflectors to help my neighbors not hit the post. (Though I think the garbage truck is the most likely to do the hitting.)

I installed the post that is the return where the driveway swing gate will lock. 

And I installed the two return posts where the side road swing gates will be. These are primarily to add some strength to the fence.

And I installed the the posts along the run behind the shed.

Now for the rails! 

Monday, July 22, 2013

Fence: Part 4a - Posts

I was able to grab some time on Sunday and begin installing the 4x4 pressure treated fence posts. They are eight feet long, and I'll be cutting them to the correct height at the very end. Installing the posts was surprisingly easy.

Step 1: Insert 4x4 into the stake sleeve
Step 2: Plumb the post using a post level
Step 3: Use a cordless driver to the screw post into the sleeve

I found I could make some minor plumb adjustments buy pushing and pulling on the installed post since it's basically just a big lever. It'll be interesting to see if this will mean than the fence is less stiff over the course of it's life.

After installing the posts at each end of the run, I ran a string line at the base of the fence and at six feet (the finished height of the fence. I also measured the slope of the fence over the course of the run and found that there's a two foot change in elevation. This was surprising as it sure doesn't look like that much of a slope.

Installing the rest of the posts was as easy as the first two, and the string lines made it even easier. Four of the post stakes turned out to be a little more out of line than I was comfortable with so I cut a 1/4" rabbet in the base of the post to pull it more in line with the fence. I'll go back later and insert a filler piece into the sleeve so that the post/sleeve fit is tight. I'll also stain and seal the rabbet.

It feels good to see a straight line of plumb posts. It reminds me of the summer when I was fourteen and worked on my father's fence crew. My primary duty was to empty the post holes with my post hole digger after the two-man auger team finished making the hole. But I also got to stretch a lot of chain link fencing, mix cement, and shovel gravel.
 Post level on a plumb post.

I used #10 x 1 1/4" square drive pan head stainless steel tapping screws. There are sixteen per post.

 Here's a photo of the full run of posts that I got done. I still have two more to do in this run.

 Another angle of the run.

And here's a photo of the rabbet. The glacial gravel in the dirt caused a few of the post stakes to wander a little durning jack hammering (about a quarter to a half of an inch). The rabbet on the post base helps lessen the alignment issue. But I'm also being a bit OC. My understanding is that a quarter of an inch is an acceptable tolerance.

Tuesday, July 09, 2013

Fence: Part 3 - Post Stakes

I spent the weekend after the fourth of July installing the fence post stakes. I rented an electric seventy pound jack hammer for the two days and was able to do fourteen stakes on Saturday and the final twelve on Sunday. I had already purchased the driver kit, and it fit the jackhammer (I'd neglected to bring it with me when I rented the jack hammer).

The process wasn't too hard.
1.  String the fence line.
2.  Measure where the fence post stake is going to be.
3.  Use a sledge hammer to start the stake.
4.  Lift the jack hammer two feet into the air and into the stake sleeve (make sure the spacer is already in the stake sleeve).
5.  Jack hammer the stake into the ground. Stop and check your post level every one to two inches. Make adjustments to the rotation and plumbness as necessary.

The videos on the Ozco Building Products website were definitely helpful. But there's a learning curve. The first two stakes went in easy (less than five minutes a piece). The third and fourth stakes were much harder, but a lot of that was likely due to tree roots. Those two stakes ended up being a little wonky and I'll have to tune those posts for plumbness and alignment differently.  

Here I am jack hammering the corner stake in. This was the second stake. 

I used a large clamp to twist the stake sleeve into alignment. 

I installed a post on this stake so I could string the fence line again.

Here's a photo of some of the tools I used.

1. The jack hammer came with it's own hand truck. SO NICE!
2. Large clamp to use as a wrench.
3. Sledge hammer and sacrificial 4x4 for setting the stake.
4. Post level (an absolute must have). It rubber-bands to the post or stake for hands-free operation.
5. Jack hammer spacer for easy stake sleeve insertion.
6. Tape measure.
7. String.
8. Toy trumpet.
9. Don't pay attention to the hacksaw. I didn't use it for anything.

Using the sledge hammer to set the stake. 

Jack hammering the stake in. 

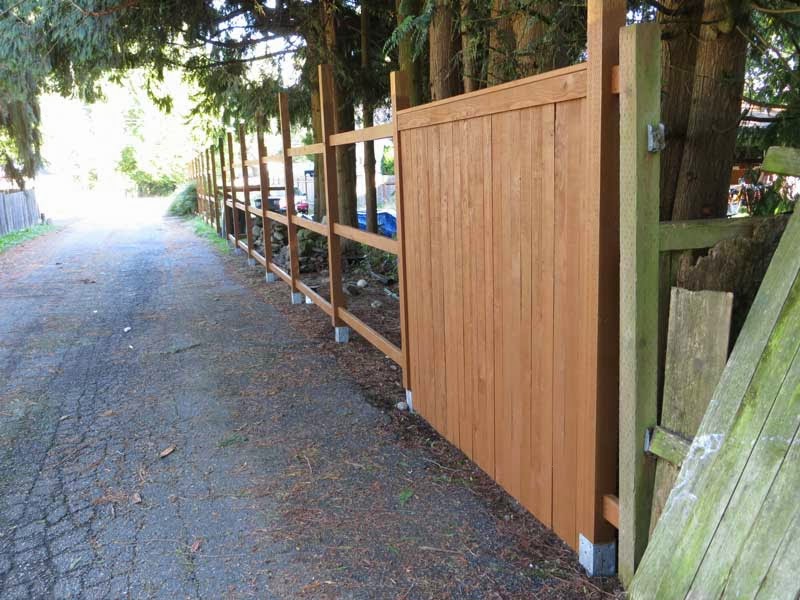
I'm doing a return on the fence to receive a large gate. I had to remove the retaining wall blocks to install the stake. I'll rebuild the retaining wall when the post is installed.

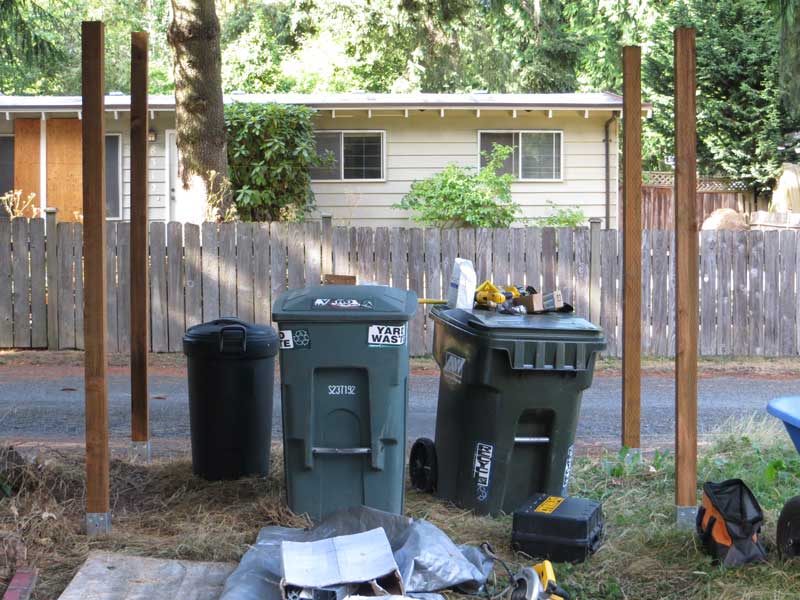
I added two stakes at the end of the driveway. They're not connected to the fence but will instead serve as a location for the address numbers. 

I'm going to install a double swing gate at this location. I'm going to have returns on the fence to stiffen the posts, too. This is where the garbage cans will live.

Panorama of the fence line. 

 I also decided to install the stakes along the section of "fence" behind the shed. The little "fence" is in pretty bad shape. I used my digging bar to lift/pry the fence out of the way (it just sits on the ground).

After returning the jack hammer, I picked up the posts that I'll be using. Pressure treated 4x4's are so HEAVY!