Sunday, September 26, 2010

Rock Farming

We've been raking the rocks out of the soil that the sewer contractors graded their work area with. There are a lot of rocks! We're mostly trying to get rid of the ones that are the size of a quarter or bigger. Especially the rocks in the lawn area. The work is going well enough. We try do do it whenever time permits. The only thing we're up against is the weeds and grass that are starting to grow back. Getting the rocks out of the way before the plants come back would definitely be nice.


Wednesday, September 15, 2010

Sewer Connection

We're connected to the sewer! The work took place at the end of August but we're just now getting around to posting about it.

The weekend before the sewer connection required us to do a little preparation work. We had to reroute the kitchen sink into the washer drain line. This required being under the house which we all know is wonderful. We also had to cut out a section of the deck to expose the old washer drain pipe and to dig part of the trench.

The last thing that we had to do was limb up the cedars so that the construction equipment had room to maneuver.

We've posted the photos to a Picasa album.
2010-08 Sewer Connection

Everything works and we've paid the contractor and the city. This was not a cheap project. If we had been more savvy, we'd have had the side sewer connection run under the front lot when the front house was being build. It probably would have cost less. But it would have meant dealing with the horrible developer.

The contractor (Bolles Construction) was fabulous. They were very professional and left the site in very good condition. They even dumped the left over crushed gravel at the end of the driveway thus filling in the muddy holes that have been there since we bought our house. We are very appreciative!

Wednesday, September 08, 2010

Hearth

We've finally gotten around to the hearth. There are a couple of stone shops that are close to us and one of them has remnants. We've been by a couple of times but never saw a piece of stone we loved (we've been hoping to fine a piece of soapstone).

Well, we dropped by again and they had a remnant that was the perfect size in Dark Julia (some variety of soapstone). The shop next door that sells entire slabs had a sample so we were able to borrow it and bring it home to see how it looked. It looked good in front of the fireplace (with with and without the baby on it).


We emailed the shop drawings of what we wanted and also gave them a deposit. The hearth was ready a week later. It barely fit in the back of the Subaru. The shop had recommended that it travel on end (like glass) so as to reduce the chance of fracture. It weighed about 100 pounds.

Soapstone needs to be oiled with mineral oil (a lot) for it to get dark. Here's a look at the first coat. We'll be putting on many more coats (even after it's installed).


We prepped the area and placed the hearth. We used silicone as the adhesive on advice from the stone shop. We'd cut a bunch of shims to support the hearth, but it didn't lay flat (the floor's not really flat enough). We ended up only using a few.


We love the look of the hearth. So does the baby. He'll love the cool stone on those hot summer days next year.

Saturday, August 28, 2010

Sandbox (No Cats Allowed)

We think the little boy might enjoy some time in a sandbox so we built one for him. After doing a little research we found that Dunn Lumber was having a sale on cedar 5 1/4 x 4's (true dimensions are 1" x 3 1/2").

Here are a couple of sketch concepts of what the sand box might look like.


We used screws to assemble the sandbox and nailed some weed barrier fabric on the bottom.


After clearing a space, we placed the sandbox and leveled it.


Now for the hard part (450 pounds of play sand). We wheeled the sand from the truck to the box location and filled up the box. Nine bags in total.


The last thing to do was to put a lid on it so the neighborhood cats don't find it. Luckily, we had a remnant of plywood that was 48"x48" (the perfect size).

Monday, August 23, 2010

Sewer Work Starts Tomorrow!

This last weekend was dedicated to getting ready for the sewer contractor. We rerouted the kitchen drain, dug a trench to expose the washer drain line, and limbed up the cedars.

The side sewer stub will be installed tomorrow. The pipe from the stub to our house will be installed on Wednesday. We are SO excited! We have to admit that having work done by a contractor is a really nice luxury.

Friday, August 06, 2010

Leaf Blower

My father will disown me when he reads this post. I am now an owner of a leaf blower. He hates leaf blowers because of the noise they make. I bought mine used and it's electric. It's not as loud as the gas powered models, but it's still pretty loud.

The reason I bought it was because our roof had a leak. The roof company employee said it was because of pine needle build up on the shallow slope of the roof. He recommended that I use a leaf blower to clean off the roof once or twice a year. He also recommended that I use moss killer on the roof to keep moss from growing.


It takes longer than using a broom, but you can tell that it's not so hard on the shingles. It's good practice to keep one's roof free of debris as it helps keep the down spouts unclogged.

Later that week the roof company owner had the employee come back out a make some adjustments where the leak occurred. He didn't think the leak was solely due to pine needle build up. Okay by me.

Wednesday, July 14, 2010

Berries!

It's berry season at the rat hole. The raspberries in the southwest corner of the yard are producing lots of berries and there are, of course, lots of strawberries along the driveway.

Here are some photos of the raspberries.


And here's a photo of the harvest.


The raspberries will get frozen because we just can't eat that many! The strawberries in this photo are the second quart of strawberries this season. Plus, another quart or two have gone bad just waiting to be picked! We just don't have time with the baby and all. Oh, well.

We're thinking of making jam.

Tuesday, July 06, 2010

Laundry/Linen Closet

We've completed a little more of the Rat-Hole. The laundry/linen closet is essentially done. Well... the inside at least. We'll put the doors on a little later.

To finish the closet off, we had to move the washer/dryer stack to the right side of the closet. This move allows for better use of space and for easier opening of the washer and dryer doors. To accomplish the move we had to move the 220V dryer outlet from one side of the closet to the other. We also had to move the light switch from inside the closet to the outside (otherwise it wouldn't be accessible). Since we were playing with the electrical, we also added a 110V outlet below the light switch (outside the closet).


A new dryer vent had to be installed as well. By now you're thinking to yourself, "Guys, measure twice, cut once." Yes, that's all well and good, but you live and you learn. We'd originally looked at the closet and decided one thing and now we've realized that we want things to be different. Fortunately, we don't have to pay the contractor to come back.

Here's a photo of me mothballing the old vent. We considered removing the vent and patching the hole, but now we have a house with TWO dryer vents. Now THAT'S a feature.


Here's a full view photo of the washer/dryer stack moved over.


And here are some photos of the completed closet.


We got the shelving at IKEA. We're going to store all of our sheets, towels, and extra blankets on it. We could have built it ourselves, but it would have cost just as much (if not more) plus the hassle of time/labor. The unit was so big that we almost couldn't fit it into the closet. The 3D model had indicated that it would be tight, but it all worked out.

Tuesday, June 15, 2010

Appraisal

We're in the process of refinancing the mortgage. We'd originally gotten an ARM so that we had as much money as possible to put into the house as possible (the house really needed it as our readers already know). We've put additional money into paying the principal as well, but the flexibility has been really nice. Well, the ARM resets in November and while it wouldn't affect our payments in the short term (in fact, they'd probably go down), the interest rate would likely go up and that would hurt us in the end.


Part of the refi process means getting a new appraisal. The appraiser came on Monday. We were kind of nervous. They did a walk-through of the house, took some pictures and were generally quite nice. We were a little embarrassed since we hadn't really had time to clean up.


We'd gotten a King county property tax assessment recently that had valued our house at about $25K below what we'd paid. We weren't too surprised since the real estate market sucks for everyone. Well, we got our copy of the new appraisal today and it came in about $35K over what we paid. Yay! This is great for our egos and hopefully our pocketbook. The higher appraisal means that we qualify for a lower interest rate. We're really happy! Now we just have to get all the other I's dotted and T's crossed.

Sunday, May 30, 2010

Improvements for Baby

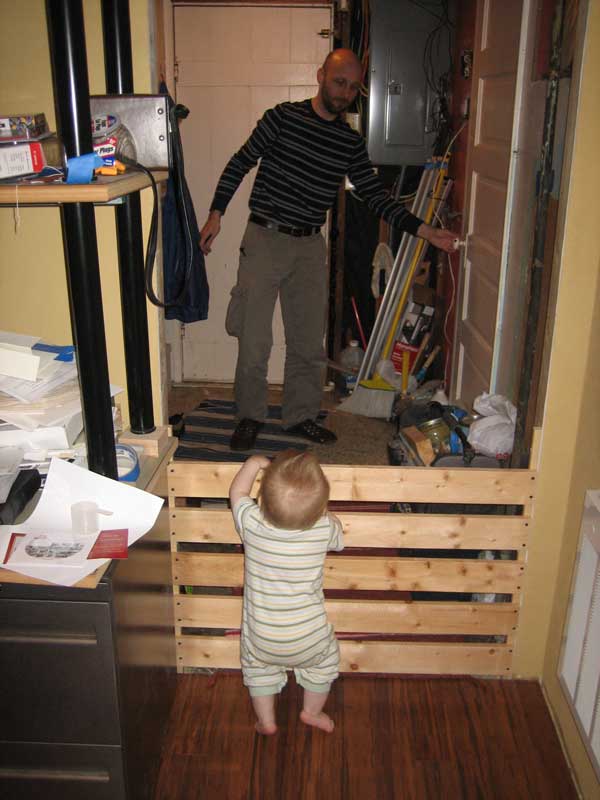
Now that the baby is crawling and getting into stuff, we've had to make a few improvements to our living situation. First things first... a baby gate to keep the baby away from the mess and tools in the entryway.


I also had to notch the door catch in the jam so the door would actually latch (it never has).

The next thing to do was put down some adhesive times where the baby crawls and plays. The kitchen has some disgusting areas. The two main problem areas are the floor in the doorway and the floor under the microwave.

Friday, May 28, 2010

Shelf Trim

I finally got the trim up around the built-in shelf. Looks pretty good. I made the cuts in the kitchen. I've got a few more nails I want to put in, but it's really fine the way it is. I used primed MDF (cheaper and easier to paint). The brother-in-law will probably give me a hard time about using the MDF since he had to prime and paint the Hemlock we used for the windows.


All that's left is to fill the holes and paint the frame. I'll probably do the nook window the same way. And maybe sooner than later.

Thursday, May 20, 2010

When Baby's Away

My spouse and baby were in MT last weekend for a funeral. I didn't go. To fill my time I worked on the house and other various projects.

Thursday night I put the second coat of polyurethane on the shelf. On Friday night, I sanded the whole thing one more time and put the third and final coat on. I used Safecoat's Polyureseal which has a volatile organic compound (VOC) rating of 111. Pretty low. Plus it's water based. I'm pretty happy with the results.


One of the other things I did was burnish the walls that have the heaters in them so I could put on the heater covers. Since baby is crawling around and putting his hands in interesting places, this was a priority.


One more priority... fill the gap. With baby crawling, the transition between the new floor and the kitchen (old floor) is missing. It catches a bunch of rug fuzz and dust so baby gets really dirty when he gets near it (or in it). I cut a few extra pieces of flooring to size, counter sunk the screw holes, and screwed them in place. Not a great solution but a respectable interim measure.


Readers may remember that my brother was in town last October and helped me with some tree trimming. Well, those piles of branches have been just sitting. While baby was away, I moved the piles of branches so that my nice neighbor can help me get rid of them (he's got a big truck and has offered).


I also weed-whacked and mowed the lawn, but those pictures are boring so I didn't post them.

I got a lot done, but I missed my spouse and baby. They're back and we're all happy again.

Sunday, May 02, 2010

Let There Be Cable!

Grandma D. is visiting so in order to give her a better room experience, we've jumped ahead and installed the cable (and phone) connection in the den. This allows us to move the modem, router, and network hard drive into the den. This also allows us to plug the printer back in (to the network drive).

The installation involved cutting a hole in the wall (in the correct spot), running the coax and phone cables from that location to their respective points outside the house, and then putting the respective cable ends on them.

Here are some photos.


We'll be moving the TV into the second bedroom today to increase its livability for our guest.

Sunday, April 25, 2010

Curtain Thoughts

We're getting closer to getting curtains up in the living/dining room. We've had the fabric for a while now and a friend is helping us sew them. We've hung some sheets up on the windows when guests have stayed over and liked the way the sheets scalloped over the bars (when being held on by safety pins). We were thinking of using that technique on the real curtains except we were going to use buttons instead of safety pins.

Turns out that the thicker fabric didn't hang as well with the button idea so we're going to go with tabs. We've hung up the curtains with a couple of different tab lengths and also looked at having the diffuser as a pocket option as well.

We like the 2" tabs (on the left) and think that we'll go with having tabs on both the diffuser and the curtain.

Here are photos of the curtains with the mock tabs.


Here's a detail photo of the diffuser.

Saturday, April 24, 2010

Some Slight Heater Modifications

The back bedroom has a couple of baseboard heaters in it. One of them is an institutional level monster that is very noisy and very hot. Nice. But it's so noisy that we've never slept with it on (we use a plug in radiator type heater for night time). Well, we were tired of it so we replaced it with a smaller (and dare we say... more friendly) unit. The overall switchover time was about an hour. Not bad. And we slept with the room heaters on last night. Cozy and quiet.

Here's a photo of the monster after it was removed.


And here's a photo of the new heater in its new home.

Thursday, April 08, 2010

Contact!

UPDATE: The phone rang last night at 8PM. I didn't even notice! Some 800 number.

I found some time this afternoon and crawled under the house to run the phone wire. The phone box was a snap to open and to connect into. There were four spots and only three were being used.


So... now the phone jack in the bookshelf is live. In fact, we've moved the phone and answering machine onto the shelf. The phone that is still in the bedroom doesn't ring so now when someone calls it won't wake up the baby. Yay!


I'll be staining and sealing the shelf as soon as I can. I have a low VOC water based stain and a low VOC water based polyurethane sealer that should go on without much problem.

Sunday, March 28, 2010

Built-in Shelf Built

I spent the weekend assembling and installing the built-in bookshelf (located in the main room next to the fireplace). This project has taken a VERY long time to get to this point. I cut the 3/4" plywood (with cherry veneer) on our table saw, but I used my friend's jointer and radial arm saw to clean up the edges and to cut the dados. I also edge-banded all of the exposed shelves and middle supports.

I assembled the shelf in the second bedroom so as to stay out of the way of the baby's play area.


I had already installed the back of the shelf in the cavity and thought that I would need to install a temporary brace to keep the shelf from racking during the move, but the shelf was rigid enough without the brace. I used screws for all joints and used dowels for alignment on the middle supports.


Here's a photo of the shelf in place before I attached the back, cut a hole for the elecrtical duplex, and secured it with some finishing nails.


My spouse wanted to see if the baby fit on the bottom shelf. He could if he curled up a little. I'm sure he'll be pulling himself on the shelf very soon!


Here's a photo of the shelf fully installed. We will be locating a land line phone on the second shelf from the bottom (you can see the duplex and the phone cable on the right).


All that's left to do is: stain, seal, and trim. We'll be using the same trim as the windows. Oh, I still need to connect the phone wire to the phone box. Maybe later today or in the next couple of days. Shouldn't be too hard.