It's berry season at the rat hole. The raspberries in the southwest corner of the yard are producing lots of berries and there are, of course, lots of strawberries along the driveway.
Here are some photos of the raspberries.
And here's a photo of the harvest.
The raspberries will get frozen because we just can't eat that many! The strawberries in this photo are the second quart of strawberries this season. Plus, another quart or two have gone bad just waiting to be picked! We just don't have time with the baby and all. Oh, well.
We're thinking of making jam.
The chronicle of the trials, tribulations, and joys of attempting to update a 1930's-era home, affectionately termed "the rat hole" because of its state of disrepair, in Kenmore, Washington.
Wednesday, July 14, 2010
Tuesday, July 06, 2010
Laundry/Linen Closet
We've completed a little more of the Rat-Hole. The laundry/linen closet is essentially done. Well... the inside at least. We'll put the doors on a little later.
To finish the closet off, we had to move the washer/dryer stack to the right side of the closet. This move allows for better use of space and for easier opening of the washer and dryer doors. To accomplish the move we had to move the 220V dryer outlet from one side of the closet to the other. We also had to move the light switch from inside the closet to the outside (otherwise it wouldn't be accessible). Since we were playing with the electrical, we also added a 110V outlet below the light switch (outside the closet).
A new dryer vent had to be installed as well. By now you're thinking to yourself, "Guys, measure twice, cut once." Yes, that's all well and good, but you live and you learn. We'd originally looked at the closet and decided one thing and now we've realized that we want things to be different. Fortunately, we don't have to pay the contractor to come back.
Here's a photo of me mothballing the old vent. We considered removing the vent and patching the hole, but now we have a house with TWO dryer vents. Now THAT'S a feature.
And here are some photos of the completed closet.
We got the shelving at IKEA. We're going to store all of our sheets, towels, and extra blankets on it. We could have built it ourselves, but it would have cost just as much (if not more) plus the hassle of time/labor. The unit was so big that we almost couldn't fit it into the closet. The 3D model had indicated that it would be tight, but it all worked out.
To finish the closet off, we had to move the washer/dryer stack to the right side of the closet. This move allows for better use of space and for easier opening of the washer and dryer doors. To accomplish the move we had to move the 220V dryer outlet from one side of the closet to the other. We also had to move the light switch from inside the closet to the outside (otherwise it wouldn't be accessible). Since we were playing with the electrical, we also added a 110V outlet below the light switch (outside the closet).
A new dryer vent had to be installed as well. By now you're thinking to yourself, "Guys, measure twice, cut once." Yes, that's all well and good, but you live and you learn. We'd originally looked at the closet and decided one thing and now we've realized that we want things to be different. Fortunately, we don't have to pay the contractor to come back.
Here's a photo of me mothballing the old vent. We considered removing the vent and patching the hole, but now we have a house with TWO dryer vents. Now THAT'S a feature.
And here are some photos of the completed closet.
We got the shelving at IKEA. We're going to store all of our sheets, towels, and extra blankets on it. We could have built it ourselves, but it would have cost just as much (if not more) plus the hassle of time/labor. The unit was so big that we almost couldn't fit it into the closet. The 3D model had indicated that it would be tight, but it all worked out.
Tuesday, June 15, 2010
Appraisal
We're in the process of refinancing the mortgage. We'd originally gotten an ARM so that we had as much money as possible to put into the house as possible (the house really needed it as our readers already know). We've put additional money into paying the principal as well, but the flexibility has been really nice. Well, the ARM resets in November and while it wouldn't affect our payments in the short term (in fact, they'd probably go down), the interest rate would likely go up and that would hurt us in the end.
Part of the refi process means getting a new appraisal. The appraiser came on Monday. We were kind of nervous. They did a walk-through of the house, took some pictures and were generally quite nice. We were a little embarrassed since we hadn't really had time to clean up.
We'd gotten a King county property tax assessment recently that had valued our house at about $25K below what we'd paid. We weren't too surprised since the real estate market sucks for everyone. Well, we got our copy of the new appraisal today and it came in about $35K over what we paid. Yay! This is great for our egos and hopefully our pocketbook. The higher appraisal means that we qualify for a lower interest rate. We're really happy! Now we just have to get all the other I's dotted and T's crossed.
Sunday, May 30, 2010
Improvements for Baby
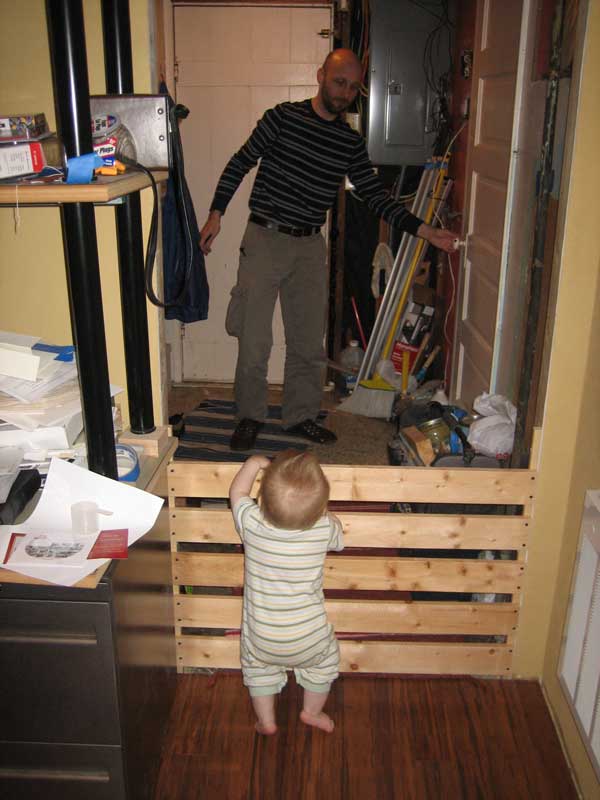
Now that the baby is crawling and getting into stuff, we've had to make a few improvements to our living situation. First things first... a baby gate to keep the baby away from the mess and tools in the entryway.
I also had to notch the door catch in the jam so the door would actually latch (it never has).
The next thing to do was put down some adhesive times where the baby crawls and plays. The kitchen has some disgusting areas. The two main problem areas are the floor in the doorway and the floor under the microwave.
I also had to notch the door catch in the jam so the door would actually latch (it never has).
The next thing to do was put down some adhesive times where the baby crawls and plays. The kitchen has some disgusting areas. The two main problem areas are the floor in the doorway and the floor under the microwave.
Friday, May 28, 2010
Shelf Trim
I finally got the trim up around the built-in shelf. Looks pretty good. I made the cuts in the kitchen. I've got a few more nails I want to put in, but it's really fine the way it is. I used primed MDF (cheaper and easier to paint). The brother-in-law will probably give me a hard time about using the MDF since he had to prime and paint the Hemlock we used for the windows.
All that's left is to fill the holes and paint the frame. I'll probably do the nook window the same way. And maybe sooner than later.
Thursday, May 20, 2010
When Baby's Away
My spouse and baby were in MT last weekend for a funeral. I didn't go. To fill my time I worked on the house and other various projects.
Thursday night I put the second coat of polyurethane on the shelf. On Friday night, I sanded the whole thing one more time and put the third and final coat on. I used Safecoat's Polyureseal which has a volatile organic compound (VOC) rating of 111. Pretty low. Plus it's water based. I'm pretty happy with the results.
One of the other things I did was burnish the walls that have the heaters in them so I could put on the heater covers. Since baby is crawling around and putting his hands in interesting places, this was a priority.
One more priority... fill the gap. With baby crawling, the transition between the new floor and the kitchen (old floor) is missing. It catches a bunch of rug fuzz and dust so baby gets really dirty when he gets near it (or in it). I cut a few extra pieces of flooring to size, counter sunk the screw holes, and screwed them in place. Not a great solution but a respectable interim measure.
Readers may remember that my brother was in town last October and helped me with some tree trimming. Well, those piles of branches have been just sitting. While baby was away, I moved the piles of branches so that my nice neighbor can help me get rid of them (he's got a big truck and has offered).
I also weed-whacked and mowed the lawn, but those pictures are boring so I didn't post them.
I got a lot done, but I missed my spouse and baby. They're back and we're all happy again.
Thursday night I put the second coat of polyurethane on the shelf. On Friday night, I sanded the whole thing one more time and put the third and final coat on. I used Safecoat's Polyureseal which has a volatile organic compound (VOC) rating of 111. Pretty low. Plus it's water based. I'm pretty happy with the results.
One of the other things I did was burnish the walls that have the heaters in them so I could put on the heater covers. Since baby is crawling around and putting his hands in interesting places, this was a priority.
One more priority... fill the gap. With baby crawling, the transition between the new floor and the kitchen (old floor) is missing. It catches a bunch of rug fuzz and dust so baby gets really dirty when he gets near it (or in it). I cut a few extra pieces of flooring to size, counter sunk the screw holes, and screwed them in place. Not a great solution but a respectable interim measure.
Readers may remember that my brother was in town last October and helped me with some tree trimming. Well, those piles of branches have been just sitting. While baby was away, I moved the piles of branches so that my nice neighbor can help me get rid of them (he's got a big truck and has offered).
I also weed-whacked and mowed the lawn, but those pictures are boring so I didn't post them.
I got a lot done, but I missed my spouse and baby. They're back and we're all happy again.
Sunday, May 02, 2010
Let There Be Cable!
Grandma D. is visiting so in order to give her a better room experience, we've jumped ahead and installed the cable (and phone) connection in the den. This allows us to move the modem, router, and network hard drive into the den. This also allows us to plug the printer back in (to the network drive).
The installation involved cutting a hole in the wall (in the correct spot), running the coax and phone cables from that location to their respective points outside the house, and then putting the respective cable ends on them.
Here are some photos.
The installation involved cutting a hole in the wall (in the correct spot), running the coax and phone cables from that location to their respective points outside the house, and then putting the respective cable ends on them.
Here are some photos.
Sunday, April 25, 2010
Curtain Thoughts
We're getting closer to getting curtains up in the living/dining room. We've had the fabric for a while now and a friend is helping us sew them. We've hung some sheets up on the windows when guests have stayed over and liked the way the sheets scalloped over the bars (when being held on by safety pins). We were thinking of using that technique on the real curtains except we were going to use buttons instead of safety pins.
Turns out that the thicker fabric didn't hang as well with the button idea so we're going to go with tabs. We've hung up the curtains with a couple of different tab lengths and also looked at having the diffuser as a pocket option as well.
We like the 2" tabs (on the left) and think that we'll go with having tabs on both the diffuser and the curtain.
Here are photos of the curtains with the mock tabs.
Here's a detail photo of the diffuser.
Turns out that the thicker fabric didn't hang as well with the button idea so we're going to go with tabs. We've hung up the curtains with a couple of different tab lengths and also looked at having the diffuser as a pocket option as well.
We like the 2" tabs (on the left) and think that we'll go with having tabs on both the diffuser and the curtain.
Here are photos of the curtains with the mock tabs.
Here's a detail photo of the diffuser.
Saturday, April 24, 2010
Some Slight Heater Modifications
The back bedroom has a couple of baseboard heaters in it. One of them is an institutional level monster that is very noisy and very hot. Nice. But it's so noisy that we've never slept with it on (we use a plug in radiator type heater for night time). Well, we were tired of it so we replaced it with a smaller (and dare we say... more friendly) unit. The overall switchover time was about an hour. Not bad. And we slept with the room heaters on last night. Cozy and quiet.
Here's a photo of the monster after it was removed.
And here's a photo of the new heater in its new home.
Here's a photo of the monster after it was removed.
And here's a photo of the new heater in its new home.
Thursday, April 08, 2010
Contact!
UPDATE: The phone rang last night at 8PM. I didn't even notice! Some 800 number.
I found some time this afternoon and crawled under the house to run the phone wire. The phone box was a snap to open and to connect into. There were four spots and only three were being used.
So... now the phone jack in the bookshelf is live. In fact, we've moved the phone and answering machine onto the shelf. The phone that is still in the bedroom doesn't ring so now when someone calls it won't wake up the baby. Yay!
I'll be staining and sealing the shelf as soon as I can. I have a low VOC water based stain and a low VOC water based polyurethane sealer that should go on without much problem.
I found some time this afternoon and crawled under the house to run the phone wire. The phone box was a snap to open and to connect into. There were four spots and only three were being used.
So... now the phone jack in the bookshelf is live. In fact, we've moved the phone and answering machine onto the shelf. The phone that is still in the bedroom doesn't ring so now when someone calls it won't wake up the baby. Yay!
I'll be staining and sealing the shelf as soon as I can. I have a low VOC water based stain and a low VOC water based polyurethane sealer that should go on without much problem.
Sunday, March 28, 2010
Built-in Shelf Built
I spent the weekend assembling and installing the built-in bookshelf (located in the main room next to the fireplace). This project has taken a VERY long time to get to this point. I cut the 3/4" plywood (with cherry veneer) on our table saw, but I used my friend's jointer and radial arm saw to clean up the edges and to cut the dados. I also edge-banded all of the exposed shelves and middle supports.
I assembled the shelf in the second bedroom so as to stay out of the way of the baby's play area.


All that's left to do is: stain, seal, and trim. We'll be using the same trim as the windows. Oh, I still need to connect the phone wire to the phone box. Maybe later today or in the next couple of days. Shouldn't be too hard.
I assembled the shelf in the second bedroom so as to stay out of the way of the baby's play area.

I had already installed the back of the shelf in the cavity and thought that I would need to install a temporary brace to keep the shelf from racking during the move, but the shelf was rigid enough without the brace. I used screws for all joints and used dowels for alignment on the middle supports.

Here's a photo of the shelf in place before I attached the back, cut a hole for the elecrtical duplex, and secured it with some finishing nails.

My spouse wanted to see if the baby fit on the bottom shelf. He could if he curled up a little. I'm sure he'll be pulling himself on the shelf very soon!

Here's a photo of the shelf fully installed. We will be locating a land line phone on the second shelf from the bottom (you can see the duplex and the phone cable on the right).
All that's left to do is: stain, seal, and trim. We'll be using the same trim as the windows. Oh, I still need to connect the phone wire to the phone box. Maybe later today or in the next couple of days. Shouldn't be too hard.
Monday, March 22, 2010
No-Rest Room
I'm posting from the husband's account - I'm too lazy to log in to my own profile. ^_^
So we have actually been working on the rat hole. Projects are so much more difficult with the baby! Not only is our workforce cut in half, but sleep deprivation hurts both motivation and the skill with which things are done (to say nothing of concentration abilities).
That said, we are making progress on getting the built-in bookshelf done. Hopefully this week or this weekend. The wood is all prepped. It just needs to be put together. Having the shelf will not only make the room look better, but we'll also be able to collect all the stacks of books we have piled about and clear off some surfaces (hopefully NOT so we can just pile more stuff on the newly cleared-off surfaces). We'll also be able to move the phone/answering machine out of our bedroom so the little one isn't woken up by callers.
Once the shelf is done, we're going to try our best to get the rest of the crown molding up quickly, then the baseboard, and then we'll install the mantle and hearth.
Then we might work on the sewer. We pray every day that the septic keeps lasting us. We'll see when that happens.
Anyway, once we have the living/dining room all trimmed out and finished, we've decided that we're going to take on the hall bath. That bathroom is the one we shower in. It's not a pretty place. Mold and dirt is suspended in the crappy silicone job, there are patches of painted drywall showing through the awful wallpaper, there's mildew on the ceiling that constantly needs to be wiped up, and the wallpaper itself is trying its darndest to grow mold. Not a place for rest and relaxation.
We don't have the funds to do a full remodel, so we're just going to do what we can to make the room look nicer and get it to a state where we can live with it for the next ten years or so. We're going to put in a plastic tub surround, get rid of some tile, put in a new medicine cabinet (maybe), improve the lighting, put in a heater, seal the crappy floor, and put new paintable wallpaper over the stuff that's in there now.
So although we haven't been posting as often, we are still working, and stay tuned for our progress!
So we have actually been working on the rat hole. Projects are so much more difficult with the baby! Not only is our workforce cut in half, but sleep deprivation hurts both motivation and the skill with which things are done (to say nothing of concentration abilities).
That said, we are making progress on getting the built-in bookshelf done. Hopefully this week or this weekend. The wood is all prepped. It just needs to be put together. Having the shelf will not only make the room look better, but we'll also be able to collect all the stacks of books we have piled about and clear off some surfaces (hopefully NOT so we can just pile more stuff on the newly cleared-off surfaces). We'll also be able to move the phone/answering machine out of our bedroom so the little one isn't woken up by callers.
Once the shelf is done, we're going to try our best to get the rest of the crown molding up quickly, then the baseboard, and then we'll install the mantle and hearth.
Then we might work on the sewer. We pray every day that the septic keeps lasting us. We'll see when that happens.
Anyway, once we have the living/dining room all trimmed out and finished, we've decided that we're going to take on the hall bath. That bathroom is the one we shower in. It's not a pretty place. Mold and dirt is suspended in the crappy silicone job, there are patches of painted drywall showing through the awful wallpaper, there's mildew on the ceiling that constantly needs to be wiped up, and the wallpaper itself is trying its darndest to grow mold. Not a place for rest and relaxation.
We don't have the funds to do a full remodel, so we're just going to do what we can to make the room look nicer and get it to a state where we can live with it for the next ten years or so. We're going to put in a plastic tub surround, get rid of some tile, put in a new medicine cabinet (maybe), improve the lighting, put in a heater, seal the crappy floor, and put new paintable wallpaper over the stuff that's in there now.
So although we haven't been posting as often, we are still working, and stay tuned for our progress!
Friday, March 05, 2010
Washer and Dryer
We just couldn't take it any more. The timer on the old dryer was only working half the time and the washer was loud and scary. Thank goodness for Presidents Day sales. We got a matched pair of LG appliances from Sears. They were delivered 5 days later. Our clothes have never been so clean! We're very happy. And the baby likes the bright control panel lights!
Wednesday, December 30, 2009
Floored!
What did you do for your winter vacation? Please write a 300 word essay.
Well... we installed our floor in the den/living room/dining room. Yay! We started in the den and worked our way eastward towards the dining area. All and all, it was relatively easy. Except maybe for the back-breaking bending over part. And the anxiety of making the wrong cuts and running out of flooring. And the saga of the air compressor that wouldn't start in the mornings. But we're getting ahead of ourselves.
The installation team for this event consisted of the brother-in-law and me. My spouse distracted the baby in the back room so that the pneumatic nailer and table saw didn't upset him too badly. B-i-L was in charge of the cut list and the master plan (which I printed out for him). He did a pretty good job of keeping me honest. I only deviated once (my fault, not his, although he might argue this point). We were able to install approximately 100 sq ft a day for a total of just under 400 sq ft.
As previously mentioned, our floor is Teragren Synergy Java strand bamboo.
Here's a photo of the den before we started.

We layed a layer of 1/4" thick cork down between the flooring and the subfloor. This was to help insulate the floor for both temperature and sound.

The den turned out to be a dimension that created no waste (12 feet wide). This was great and made the install much faster. Here are some photos of the layout.
I used a pneumatic nailer. I'd originally rented a manual one, but after practicing with it a couple of times, I realized the error of my ways (much harder to use than a pneumatic floor nailer) and went back to rent the right tool.

The air compressor that I rented kept tripping the breaker. The Hertz rental place guy said it was that the voltage on my circuit was too low, but I plugged it in on several different circuits (15amp and 20amp, both with and without an extension cord) and it still had a hard time starting. It seemed like the motor was binding up because of a sticky axle. B-i-L and I had to spend more than 15 minutes each morning trying to get the thing started. The the last day it wouldn't start at all so I had to run to Home Depot to rent another air compressor. It worked great and made me wish I'd rented from HD instead of Hertz.
Here's a photo of me cutting the flooring planks to length. It looks like I'm using the fence in the photo, but I'm not.
Day two. I wore knee pads in the beginning of the project, but I eventually ditched them since it was faster to just bend over. More painful at the end of the day, too. The buckets in the next photo are being used to weigh down the floor next to the wall since I couldn't use the nailer in tight locations. I glued the flooring in these spots since I didn't want to nail through the top of the floor (as is common practice).
Here's a photo of the fireplace and future hearth location. We centered the flooring planks on the fireplace.
This was the end of day two.
As I was bringing the air compressor inside for the night, I noticed the view from our entryway. The angle makes it look like the flooring is complete, and this really perked me up.

We took Christmas day off.
Here's a good shot of me using cutoff pieces as hammering blocks. I used them to get the flooring planks nice and tight.
Day four had me worried since I had to spend time renting a new air compressor and I didn't want to run out of time (we try to put the baby to bed by 7:30).

I returned all of the equipment the next day. I told Hertz about my problems and they chose to only charge me for two days' rental of the nailer and not at all for the compressor. While disappointed in the overall rental experience, they made up for it in the end.
The floor looks great! B-i-L thinks the heaters turn on less frequently, too. We put felt pads on all the furniture to minimize the risk of scratches to the floor. All that's left is the trim work.
Well... we installed our floor in the den/living room/dining room. Yay! We started in the den and worked our way eastward towards the dining area. All and all, it was relatively easy. Except maybe for the back-breaking bending over part. And the anxiety of making the wrong cuts and running out of flooring. And the saga of the air compressor that wouldn't start in the mornings. But we're getting ahead of ourselves.
The installation team for this event consisted of the brother-in-law and me. My spouse distracted the baby in the back room so that the pneumatic nailer and table saw didn't upset him too badly. B-i-L was in charge of the cut list and the master plan (which I printed out for him). He did a pretty good job of keeping me honest. I only deviated once (my fault, not his, although he might argue this point). We were able to install approximately 100 sq ft a day for a total of just under 400 sq ft.
As previously mentioned, our floor is Teragren Synergy Java strand bamboo.
Here's a photo of the den before we started.

We layed a layer of 1/4" thick cork down between the flooring and the subfloor. This was to help insulate the floor for both temperature and sound.

The den turned out to be a dimension that created no waste (12 feet wide). This was great and made the install much faster. Here are some photos of the layout.
I used a pneumatic nailer. I'd originally rented a manual one, but after practicing with it a couple of times, I realized the error of my ways (much harder to use than a pneumatic floor nailer) and went back to rent the right tool.

The air compressor that I rented kept tripping the breaker. The Hertz rental place guy said it was that the voltage on my circuit was too low, but I plugged it in on several different circuits (15amp and 20amp, both with and without an extension cord) and it still had a hard time starting. It seemed like the motor was binding up because of a sticky axle. B-i-L and I had to spend more than 15 minutes each morning trying to get the thing started. The the last day it wouldn't start at all so I had to run to Home Depot to rent another air compressor. It worked great and made me wish I'd rented from HD instead of Hertz.
Here's a photo of me cutting the flooring planks to length. It looks like I'm using the fence in the photo, but I'm not.
Day two. I wore knee pads in the beginning of the project, but I eventually ditched them since it was faster to just bend over. More painful at the end of the day, too. The buckets in the next photo are being used to weigh down the floor next to the wall since I couldn't use the nailer in tight locations. I glued the flooring in these spots since I didn't want to nail through the top of the floor (as is common practice).
B-i-L took a photo of the floor that I thought showed the color and visual texture quite well.
Here's a photo of the fireplace and future hearth location. We centered the flooring planks on the fireplace.
This was the end of day two.
As I was bringing the air compressor inside for the night, I noticed the view from our entryway. The angle makes it look like the flooring is complete, and this really perked me up.

We took Christmas day off.
Here's a good shot of me using cutoff pieces as hammering blocks. I used them to get the flooring planks nice and tight.
Day four had me worried since I had to spend time renting a new air compressor and I didn't want to run out of time (we try to put the baby to bed by 7:30).

I had to glue the last four rows of flooring down. The buckets of leftover wall clay and the leftover flooring planks were great weights.
I returned all of the equipment the next day. I told Hertz about my problems and they chose to only charge me for two days' rental of the nailer and not at all for the compressor. While disappointed in the overall rental experience, they made up for it in the end.
The floor looks great! B-i-L thinks the heaters turn on less frequently, too. We put felt pads on all the furniture to minimize the risk of scratches to the floor. All that's left is the trim work.
Subscribe to:
Posts (Atom)