Saturday, November 08, 2014

Electrical and Plumbing Progress

I was able to move and connect all of the electrical connections and hot/cold water lines today. I'll be installing the vent pipe and hopefully some of the drain line for the sink and toilet tomorrow.

It's kind of disorienting to not have the outlets and light switches hanging from wires in the middle of the sink alcove. But it's also nice to have all the wires out of the way, too.

Here's a photo of the sink alcove. You can see the mirror/medicine cabinet, the sconce j-boxes on either side, and the two water lines coming down from the attic space. I'll install the vent pipe and drain tomorrow.

Here are all the electrical connections. There are three switches (for the sconces, the fan, and the light above the shower. There is also a GFCI outlet that feeds the entire run of electrical for the bathroom. In between the switches and GFCI duplex is a night light. Up top is the thermostat location that will control the electrical radiant floor heat. I've run some string in the conduit so I can pull the wires for the radiant heat system and the sensor from the floor up to the thermostat.

Here's a photo of the toilet wall. You can see the new vent pipe (that I still have to connect down below and up above). You can also see the water supply line for the toilet. I've also installed an electrical outlet that can be used for a bidet or other smart toilet accessory (like the Brondell Swash).

You can also see the boxes of 3/4" white hex tile in this last photo.

Monday, October 27, 2014

Love the New Shower

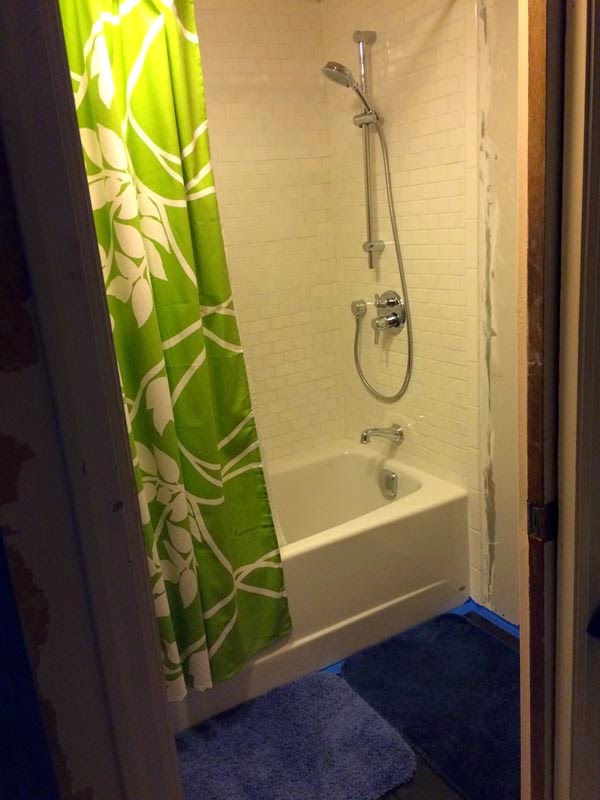
I love the new shower and tub. I'm generally pretty happy with all the decisions we made.

1. I love the controls on the Hansgrohe valve. Having the pressure and the temperature completely separate is nice. And I like the temperature override to prevent scalding. I can turn off this feature, but I suspect I'll leave it on until the kids are older. The shower head had a nice flow, especially after I removed the flow regulating O ring. The Eco-Air spray feels nice and doesn't splatter water all over the shower walls after it bounces off my skin.

2. I really like the tub. I cleaned it today using Bon Ami and a soft nylon brush (as directed by the manufacturer) and it was very easy. I look forward to taking a bath in it someday. It seems to warm of quickly and stay very warm.

3. I like the wall tiles, but I feel like we show have picked a higher quality and larger tile though. 3x6 tiles would have been nicer for suction cups and required less grout overall. I'm happy we went with a non-contrasting grout and tile combination. Everthing blends together and I don't dwell on the natural imperfections of tile installations.

4. I also regret not building in shelving for bottles and soap. My wife nixed the choice of having corner shelves. And I vetoed having inset cubbies/shelves because I was so paranoid of future leaks and water damage. We'll definitely be building inset shelving on the master bath/shower.

If you want to come over and try out the shower, let me know. ~_^

Tuesday, October 21, 2014

Things Learned from this Bathroom Remodel (so far)

I spoke with a friend yesterday about my current bathroom remodel. He had some questions and I thought I'd share some of my answers.

Q: What's the most valuable piece of advice that I got from contractors?
A: Don't buy a bathtub that costs less than $400. We bought an American Standard Americast  steel tub for about $500. It weighs about 160 pounds (a third of the cast iron tub it replaced). We're very happy with it so far.

Q: Will I use a tile contractor for future work?
A: Maybe, but probably not. After watching the install and even doing a little tile install myself, I feel like I could do a pretty good job. Good advice on choosing tile... buy the best tile you can afford. Cheap tile doesn't cut nicely (chipped edge). Buy porcelain instead of ceramic it possible.

Q: Was the contractor happy with the work I did prior to him starting?
A: He was very complimentary on how plumb my walls were (he said he had never worked on walls that were so plumb... only 1/8" off). It made his cuts for the tile in the corners all the same which saved a lot of time. I guess it paid off having spent the extra time reframing the walls.

Q: Where did I buy my valve and trim package for the shower?
A: We bought it all at Aurora Plumbing in Seattle. The folks in the parts department have always been helpful (they removed the flow restrictor in the showerhead for me - I can control flow via the valve) and the sales staff in the showroom (Adele) was particularly helpful in guiding us to the right valves, spouts, etc. We just bought the new toilet for the hall bath from them (a Toto).

Friday, October 17, 2014

A Functioning Shower and Tub

I spent what time I had today installing the valve controls, trim, shower hardware, and spout. I also spent some time cleaning the tub, floor, and covering the big hole in the subfloor where the toilet will eventually sit. The tub was surprisingly easy to clean. Nothing really sticks to it: not tape, not mortar, not grout. Silicone does stick though.

The shower is now functional! I took the first shower and have to admit that it was perhaps the best shower I have ever had in my life! Going almost four weeks without one made this one extra special. My spouse also got to take a shower. She was disappointed in the shower's water pressure. I'll try to address that tomorrow. The shower wand has a flow control in it. Our two kids got to take a bath as well. They had a great time!


I taped plastic on to the floor to provide a little protection should some water find its way out of the shower. The plastic will help keep the subfloor dry and our feet clean. I also hung a new shower curtain that my spouse bought well over a year ago. It looks very nice!

Tuesday, October 14, 2014

Tub Walls and Tile

The tile contractor started last Thursday. He got the HardiBacker concrete board up the first day and some tile. I had to move the valve back an inch that evening though because it was too far forward to allow the wall board to lay flat. It was a moderately easy fix, and that allowed the contractor to re-install the board flat the next day and install more tile.

He left his tile saw and tools so that I could install more tile over the weekend, but I only did a little bit as I was pretty tired of all the work I'd done over the previous week. Plus my father-in-law was in town and we spent some time doing family stuff like picking pumpkins.

The contractor finished installing most of the time on Monday and then grouted on Tuesday. The grout needs to set for 72 hours and then we can shower! The faucet spout, valve handle, and shower connection can all be installed after 24 hours, but a couple of holes need to be drilled for the shower adjustment bar and that can't happen until after 72 hours.

The tile was very difficult to work with. It was cheap ceramic tile and if we could do it over we'd pick a higher quality porcelain tile. We had initially wanted to do a dark contrasting grout, but we changed our minds after the tile started getting installed. We feel the white grout hides some of the problems that the tile gave us.

We're thinking that we might try to do the tile on the floor in this bathroom ourselves as well as in the master bathroom. And we might try to do tighter grout joints. We'll have to do a little research first though.

Wednesday, October 08, 2014

Tub and Plumbing Installed

I installed the tub (and framed around it). I also connected the drain. Then I installed valve and all the connections for the shower. I flushed the valve (as the instructions told me to) and then tested all the joints for leaks. No leaks. Yay!


We chose a Hansgrohe valve as well as the other pieces of the shower. We're pretty excited to use it! The controls for the temperature, pressure, and diverter are really slick. We're also installing a height adjustable shower head.

Tile for Hall Bath Shower

We picked the tile for the hall bath shower. It's a 2x4 white mini subway tile. Off the shelf at Home Depot. The house up the street that we visited to see the contractor's work used them. They're nice. The contractors don't like installing them because they are fussy. We're going to use a dark gray grout with them. The contrast should be quite nice.


Saturday, October 04, 2014

New Tub

Just a quick update on the bathroom remodel.

So far I have:
  • Demolished the old subfloor and wall framing
  • Removed sixty 5 gallon buckets of dirt from under the house to make room for me to work
  • Sistered three joists
  • Removed rot from two joists
  • Installed new subfloor (except around the toilet area)
  • Prepared the tub drain plumbing to receive the tub
  • Carried the new tub into the bathroom (with the help of a friend)


The new tub seems nice.

My next steps are to reframe the walls around the tub, set the tub, and install the plumbing components for the tub and shower.

We will got buy tile tomorrow. Hopefully.

Sunday, September 28, 2014

Good-bye Old Steel Pipe Plumbing

One of the very first things we did when we moved into the house was convert all the hot water lines to PEX because they were corroded to the point that there was virtually no water pressure. This fire drill to get the hall bath back up and running has given us the opportunity to convert the last of the cold water valves (the shower and toilets) from steel pipe to PEX. Now whenever we see a steel pipe we can cut it with my reciprocating saw (a.k.a. the light saber) because they are defunct!

Good-bye old steel plumbing.

Hello new PEX plumbing. I've love you, SharkBite!

The first round of PEX was installed using Rehau fittings. The tools required to install the fittings were rented for $130 a day and they were not that easy to use. We have been using SharkBite fittings for the rest of the plumbing conversion and really appreciate the ease of use and time savings they offer.

Wednesday, September 24, 2014

Hall Bath Hell

It's really only sort of hell. An odd sort of livable hell. The hope is that it will turn into heaven in the next few weeks.

Here's the situation:
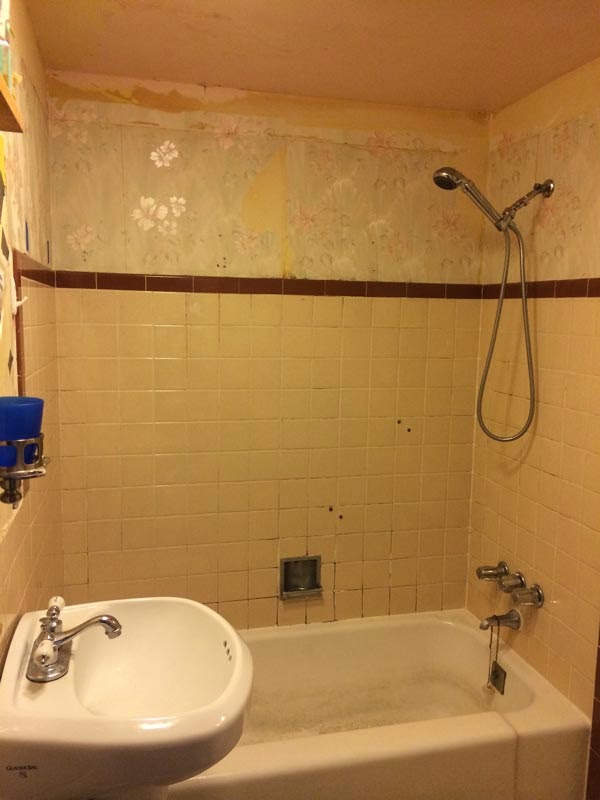
Ever since we moved into the rat hole, we've had issues with the bathrooms. Even bleached, de-mildewed, etc., several times, they've always been semi-horrific. The tile surround for the tub in the hall bath in particular has been awful, slowly collapsing in on itself even after a couple of repairs. We knew the deteriorating tile was trouble, but we limped it along.

Then we decided for our ten-year wedding anniversary that we would finally do something about it. Since we intended to completely redo the bathroom someday, we opted for a temporary solution of a plastic tub surround. We found one we could live with for a couple of years and purchased it. The plan was to put up the surround, redo the master bathroom next fall/winter, then redo the hall bathroom the year after. That way we'd always have functional bathing facilities.

We opened the walls in the hall bathroom and found horror.

Ok, so it wasn't so bad, nor was it unexpected. Lots of old insect damage and rot, but nothing that looked recent. We (and when I say "we" I really mean my spouse) cleaned out the detritus, tore out the studs, and really examined the damage. We figured we could reframe, replumb, and be on our way.

 Before and After Demolition

Then the tub sunk into the subfloor, which was rotten. The leaks over the years had degraded the subfloor on one side of the tub. My spouse stepped in the tub, and down it went. It's not like the subfloor catastrophically let go, but it was a definite "oh, crap" sort of moment. We looked at the tub, which we had planned on keeping and refinishing, talked about ways to move the cast-iron beast in order to look at/repair the subfloor, and finally decided to get another opinion.

We talked to a contractor. He said ditch the tub and replace the subfloor. Just put plastic over the tub and whack it with a sledgehammer until it shattered. We figured it wouldn't take that long, and then we'd rest easier knowing just how bad the subfloor situation was. Our little sledge didn't work, so we borrowed a big one from a neighbor. Porcelain shards of danger were safely captured by the plastic. The broken cast iron smelled sort of like welding.

Two and a half hours later we have two small children melting down from exhaustion and we are totally fried, but the tub was gone. Unfortunately our hall bath toilet was also a casualty. Our crappy half-bath in the master bathroom was now our only bathroom. Good thing both bathrooms were now just one big room, I guess.


The good news is that the subfloor damage doesn't look too extensive. We also found a contractor that can help us get it up and running, hopefully in a couple of weeks. We just bought a fancy-schmancy shower/tub faucet/valve set, a new tub is on its way, and we're thinking we'll just say screw it and make the hall bath what we wanted it to be in a few years. Although the thought of going into debt right before we were going to try to finance our bigger additions makes me feel a little ill, we'll figure something out. It will be AMAZING to have a bathroom that I don't shudder upon entering every single time.

So, we'll see how it goes. My spouse will work on reframing, replumbing, etc. to prep for the contractors. Hopefully we can find someone to help watch the kiddos during the day so it goes more quickly. In the meantime, I'll be showering at the local YMCA. I'm advocating bathing the kids in a big galvanized washtub in the kitchen. Living rough in the rat hole once again!

Tuesday, September 09, 2014

Shed Extension - As Is VS Proposed

It has been about three years since I last worked on the shed. I got  the three compartments functional and had the take a break to work on Arlo's bedroom. My intention was to get back to it the next year and add extensions on both ends that had ground level paver floors. I'm going to try and get the roof up on each extension before winter this year. The previous post showed the work I did for the post bases for the new extensions.

Here are some images that I pulled from the SketchUp model that I built (so I could figure out how much wood I was going to need to build the shed).

Front - As Is

Front - with Proposed Extensions

View of As Is from NW Corner 

 View of Proposed from NW Corner

View of Proposed with Pavers from NW Corner

Monday, September 08, 2014

Shed Extensions - Post Bases

I spent yesterday measuring, stringing, digging post holes, and pouring concrete footings for the post base brackets. My two-year-old had lots of fun going over and under the string lines. The extension on the east side of the shed will be ten feet long. The extension on the west side will be six feet long.

I found a broken off piece of t-post right where I was digging a post hole! The short plat drawing shows a fence in this area (a long time ago).

I bought the posts for the west side of the extension and am using them as guides for the post base brackets. It's nice to have something solid to make measurements from and hold the brackets in place while the concrete cures.

I had to built up the area about the post bases on the east side. I built the forms out of pressure-treated 2x4. I probably won't remove the forms (but I might). This whole area is just going to be covered in gravel and pavers.

Saturday, September 06, 2014

Roof Sweeping

I spent three hours today sweeping off the roof and cleaning out the gutters. I removed over twelve 5 gallon buckets of of debris from the west side of the roof. The east side of the roof had significantly less debris, but I just swept it onto the ground instead of putting it in buckets. There was probably about five buckets worth though. My five-year-old helped me a little. He mostly remarked how much he loved being on the roof. He also told me that he wanted the roof spick and span. I think I did pretty well. The summer heat had desiccated the moss enough that it was easier than usual to break away from the asphalt shingles.

Monday, August 25, 2014

Fence: Part 7 - Rails and Pickets (No Stain)

The fence back by the shed is so decrepit that I've decided to jump into construction on the new fence. Especially now that the area has been cleaned of all ivy, laurel, and blackberry. I spoke to the neighbor and she was excited to get a new fence in that area. She even offered to pay for half of the fence!

I decided to put the pickets on the inside of the fence rails because I can install them with out having to go onto the neighbor's property and fighting with all the brush and junk. I also decided not to stain the fence on the south side of the yard because no one is ever going to see it. It's going much faster than the fence on the north side by the driveway!

The almost two-year-old enjoyed handing me screws and using the hammer to pound on the pickets. He knew about pounding on pickets because I had him help me repair some pickets on the neighbor's fence on the west side.

Friday, August 22, 2014

Leveling the Ash Pile

I want to build a couple of extensions onto the shed before winter so I started digging up the old ash pile on the east side of the shed. The pile is about 18" high and about 5' in diameter. It took about 6 wheel barrow loads to remove the pile.

Guess what I found under under the pile! An old plastic wrapped 55 gallon steel drum with a piece of concrete on top. Hmmm. I suspect it's an OLD DIY septic tank. It sounds hollow when I tap on it. All kinds of different ideas have passed through my mind as to what's in it.

I put the old piece of concrete back on top of it when I was done moving the pile.

I suspect that I'll get a load of 5/8ths crushed gravel, break the drum open, fill it, and then lay pavers over the top. Well see.

I also filled yard waste six bags with the leaves and branches of the big branch I cut off a couple of weeks ago.

Monday, August 11, 2014

Tree Trimming

I am going to try and finish building the extensions to the shed before fall this year. And since I have clear ground where those extensions are going to be I figure I should cut any overhanging tree branches now. There is only one branch that is truly overhanging so that's the one I cut on Sunday.

The branch was about twenty feet up, and since I needed to rent a chainsaw I thought I might rent a tree climbing harness and boot spikes and try to be safe. My spouse helped be put on the harness and spikes and explained the basics on how to climb. 

I had to first cut away all the undergrowth around the base of the tree. My neighbor says he thinks the tree is an English Laurel and we both agree that it's a weed. It's not on either of our properties. My other neighbor says I can do whatever I want to it. I may get more aggressive with the tree in the future and attack one of the really big limbs.

I used a ladder to climb up the first six feet. Then I strapped myself to the tree and started climbing. It wasn't easy! I think climbing a straight fir and pine tree would be a lot easier. The laurel tree's bark was not ideal. I slipped once and hit my chin. If I hadn't had a beard I would have lost some skin.

I actually just climbed up the last four feet without using the climbing gear. It was a little easier. I sat on the limb I was going to cut and then slowly started chainsawing it about three feet out from where I sat. The branch's fall was slow and controlled even though I didn't tie a rope to it. It grazed the fence but didn't do any real damage. My neighbor started right away cutting up part of the branch that was on his side of the fence. Then I climbed down and started cutting up all the branches into smaller pieces.

I also spent a little time cutting up a few fallen branches around the yard that are too big for me to dump into the yard waste container. It was kind of fun running around cutting stuff up. That was yesterday. I'm sore today.

Monday, July 28, 2014

Additions - Drawings

I've been working on designing, drawing, and modeling our house additions. I've also been calling contractors in order to get estimates so that we can hopefully get a loan and pay contractors to do our additions for us. 

Here's what our house looks like right now.

View of the NW Corner


View of the SE Corner

Floorplan of the Additions
The additions include enclosing the carport for an office space and a guest bedroom, a third bedroom in the SE corner of the house, a covered porch on the north side of the house, and an exterior utility closet for a boiler that will supply hot water plumbing fixtures and for radiant floor heating.

Here's a view of the NE corner of the house. You can see the porch and the 3rd bedroom.

Here's a view of the NW corner of the house. You can see the porch and the enclosed carport.

Here's a view of the SW corner of the house. You can see the carport addition, the utility closet, and the 3rd bedroom.

I'm really excited about the covered porch. I really think it'll make the north side of the house look like the  front of a house. And it'll give us the opportunity to reside the front of the house, too. We will likely move the electric meter, the cable, and the phone runs to the east side of the house when we do the porch. That will be a nice aesthetic upgrade.