Sunday, August 11, 2013

Fence: Part 4b - Posts

I finished installing that last of the fence posts.

The two posts at the end of the main run needed to be "tuned" so that they would be in line with the rest. There were too many roots in the way to get the stake in line perfectly.

Here's a photo of what I did. I did a big notch and then filled the remainder of the sleeve with a piece of wood that I screwed onto the main post. I may add a little piece to aesthetically fill the notch at the bottom.

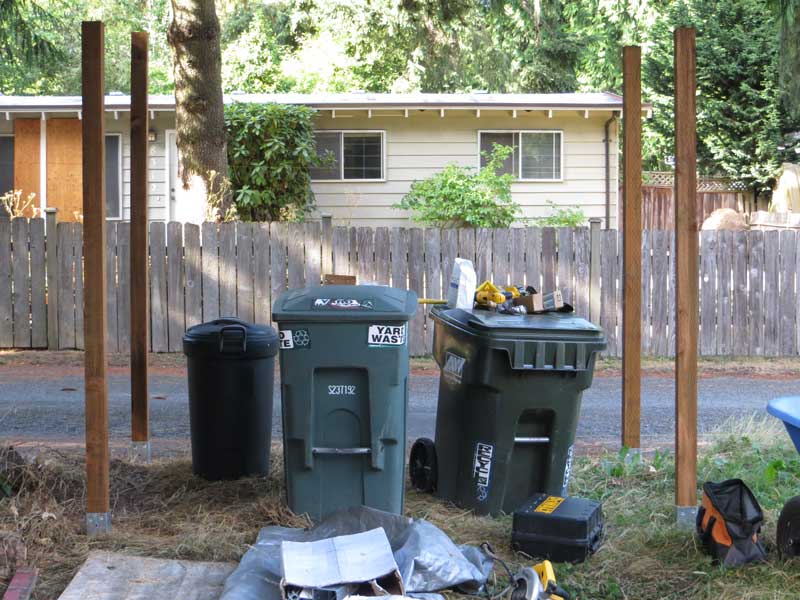
I also installed the posts at the end of the driveway. They will be short (finish height to be between 42" and 48") for better visibility. I decided to screw on the reflectors to help my neighbors not hit the post. (Though I think the garbage truck is the most likely to do the hitting.)

I installed the post that is the return where the driveway swing gate will lock. 

And I installed the two return posts where the side road swing gates will be. These are primarily to add some strength to the fence.

And I installed the the posts along the run behind the shed.

Now for the rails! 

Monday, July 22, 2013

Fence: Part 4a - Posts

I was able to grab some time on Sunday and begin installing the 4x4 pressure treated fence posts. They are eight feet long, and I'll be cutting them to the correct height at the very end. Installing the posts was surprisingly easy.

Step 1: Insert 4x4 into the stake sleeve
Step 2: Plumb the post using a post level
Step 3: Use a cordless driver to the screw post into the sleeve

I found I could make some minor plumb adjustments buy pushing and pulling on the installed post since it's basically just a big lever. It'll be interesting to see if this will mean than the fence is less stiff over the course of it's life.

After installing the posts at each end of the run, I ran a string line at the base of the fence and at six feet (the finished height of the fence. I also measured the slope of the fence over the course of the run and found that there's a two foot change in elevation. This was surprising as it sure doesn't look like that much of a slope.

Installing the rest of the posts was as easy as the first two, and the string lines made it even easier. Four of the post stakes turned out to be a little more out of line than I was comfortable with so I cut a 1/4" rabbet in the base of the post to pull it more in line with the fence. I'll go back later and insert a filler piece into the sleeve so that the post/sleeve fit is tight. I'll also stain and seal the rabbet.

It feels good to see a straight line of plumb posts. It reminds me of the summer when I was fourteen and worked on my father's fence crew. My primary duty was to empty the post holes with my post hole digger after the two-man auger team finished making the hole. But I also got to stretch a lot of chain link fencing, mix cement, and shovel gravel.
 Post level on a plumb post.

I used #10 x 1 1/4" square drive pan head stainless steel tapping screws. There are sixteen per post.

 Here's a photo of the full run of posts that I got done. I still have two more to do in this run.

 Another angle of the run.

And here's a photo of the rabbet. The glacial gravel in the dirt caused a few of the post stakes to wander a little durning jack hammering (about a quarter to a half of an inch). The rabbet on the post base helps lessen the alignment issue. But I'm also being a bit OC. My understanding is that a quarter of an inch is an acceptable tolerance.

Tuesday, July 09, 2013

Fence: Part 3 - Post Stakes

I spent the weekend after the fourth of July installing the fence post stakes. I rented an electric seventy pound jack hammer for the two days and was able to do fourteen stakes on Saturday and the final twelve on Sunday. I had already purchased the driver kit, and it fit the jackhammer (I'd neglected to bring it with me when I rented the jack hammer).

The process wasn't too hard.
1.  String the fence line.
2.  Measure where the fence post stake is going to be.
3.  Use a sledge hammer to start the stake.
4.  Lift the jack hammer two feet into the air and into the stake sleeve (make sure the spacer is already in the stake sleeve).
5.  Jack hammer the stake into the ground. Stop and check your post level every one to two inches. Make adjustments to the rotation and plumbness as necessary.

The videos on the Ozco Building Products website were definitely helpful. But there's a learning curve. The first two stakes went in easy (less than five minutes a piece). The third and fourth stakes were much harder, but a lot of that was likely due to tree roots. Those two stakes ended up being a little wonky and I'll have to tune those posts for plumbness and alignment differently.  

Here I am jack hammering the corner stake in. This was the second stake. 

I used a large clamp to twist the stake sleeve into alignment. 

I installed a post on this stake so I could string the fence line again.

Here's a photo of some of the tools I used.

1. The jack hammer came with it's own hand truck. SO NICE!
2. Large clamp to use as a wrench.
3. Sledge hammer and sacrificial 4x4 for setting the stake.
4. Post level (an absolute must have). It rubber-bands to the post or stake for hands-free operation.
5. Jack hammer spacer for easy stake sleeve insertion.
6. Tape measure.
7. String.
8. Toy trumpet.
9. Don't pay attention to the hacksaw. I didn't use it for anything.

Using the sledge hammer to set the stake. 

Jack hammering the stake in. 

I'm doing a return on the fence to receive a large gate. I had to remove the retaining wall blocks to install the stake. I'll rebuild the retaining wall when the post is installed.

I added two stakes at the end of the driveway. They're not connected to the fence but will instead serve as a location for the address numbers. 

I'm going to install a double swing gate at this location. I'm going to have returns on the fence to stiffen the posts, too. This is where the garbage cans will live.

Panorama of the fence line. 

 I also decided to install the stakes along the section of "fence" behind the shed. The little "fence" is in pretty bad shape. I used my digging bar to lift/pry the fence out of the way (it just sits on the ground).

After returning the jack hammer, I picked up the posts that I'll be using. Pressure treated 4x4's are so HEAVY!

Friday, July 05, 2013

Fence: Part 2 - Demolition

I grabbed some time on the 4th of July and tore down the old crappy fence. It was really quite easy. And my four-year-old helper was very well behaved.

before                                                  after

My helper wasn't happy that I wouldn't let him beat on our neighbor's fence. But he collected all the nails I pulled out of the old fence and wore his ear protection all on this own.

The 2x4 rails are rotten and going to the dump. The fiberglass panels brittle and also going to the dump. The posts are all cedar half and quarter logs and aren't painted or stained. I could throw them in the yard waste bin or keep them for the four-year-old to play with.

There was only on post that was cemented into the ground (out of seven). The rest were just sitting on the surface of the ground. One had a t-post holding it up. The wood at the base of the concreted post had rotted away decades ago so now there's just a nice hole in the ground. I'm debating whether I should dig out the concrete or not. (I probably won't and just fill the hole with dirt.)

Here's another view of the area where I removed the fence. The neighbor's fence is in sad shape, but the posts are generally in okay shape. I'll be installing a post of my own at the end of my fence and not using his post.

Sunday, May 26, 2013

Fence: Part 1 - Property Line

I was finally able to find time to string the property line for the fence today! Hooray!

I clamped a piece of wood to my ladder and screwed in a screw-eye so I could hang a plumb-bob above the property stake at the end of the driveway. Then I pulled a string from the end of the driveway to the neighbor's fence post at the rear of our lot (at distance of about 216 feet). The string was six feet in the air so I had to use the plumb-bob to locate the line onto the ground.

But first I had to trim away some of he hedge so I could actually see the ground. I'll eventually be moving the hedge plants in this area to the end of the driveway where the plants are a bit stunted. I really should have done that first, but... I don't really have the time right now to be digging holes and transplanting large shrubs.

After locating the property line, I located the point where the fence will stop and return to fence on the opposite side of the driveway. Our plans are to install a 16' steel swing gate across the driveway. I again used the ladder to run a string from the fence across to the hedge. 


Now I have two strings and five stakes locating the fence corner. And all this is under the hedge.


My plans are to use Oz-Post spikes to install the posts. I'll try to post some drawings soon.

Saturday, April 06, 2013

2nd Bedroom - Part 15: Black-out Curtains

I installed some black-out fabric on the back side of the curtains in the almost-four-year-old's room. This should help with bedtime and the long, bright summer evenings.

Sunday, March 24, 2013

Violets in the Lawn

We planted some of the violets from my wife's childhood home in our lawn back when we installed the lawn.  We thought we'd lost them to the slugs after the first year because they never really thrived or flowered. Well... this year they flowered!

Tuesday, November 27, 2012

2nd Bedroom - Part 14: Built-in Cabinet

It's taken more than two months, but I have finally finished the built-in cabinet in the second bedroom.  Having a newborn competing for all my time has left little time for house work, but I've managed a few moments here and there.

The big open cavity in the wall was a nice place to dump my tools during the remodel of the bedroom.  One of the first things I had to do was clean out all of my tools!  Then I built some 2x4 supports for the future cabinet and nailed them to the floor.

As you may recall from a previous post, I built a 3D model of the cabinet (in SketchUp).  This model helped answer several questions during the design phase (especially about the size and number of the doors and drawers).


Having the 3D model also allowed me to get an accurate count of all the parts I needed and even do a yield study to determine how much material I would need to buy.

After figuring out how I would build the cabinet myself, I decided to do some drawings (see sample below) and get some quotes from a couple of different cabinet shops to see if it might not be worth it to have someone else fabricate the parts for me.  Materials would have cost me about $180.  The prices I got back were $500 and $800 (including materials).  I wasn't willing to pay those prices, but I still didn't want to fabricate the parts myself if I didn't have to.

I used to work for Waston Furniture Group as a product designer before becoming a full time stay-at-home dad.  I decided to see if my former coworkers might not grace me with a small favor.  They were, in fact, willing to do the fabrication!  I sent over my drawings and DXF files (for CNC programming).

Many, many thanks to them for their help!

Having such accurate parts with pilot holes made assembly so much easier and less time consuming (this is important since I now have a wee baby to care for as well as a three-year-old).

I used two Wolfcraft 90° clamps to hold the panels together while I screwed them together.  I also had two spacers fabricated so that the drawer cavity separator panels could be assembled more accurately.  I decided to use screws for everything because you can't see the fasteners since this is a built-in cabinet.

Getting the assembled cabinet into the wall cavity was both harder and easier than I expected.  Harder because the amount of room I left myself to work with was very small.  Easier because I  leveled the supports pretty accurately and the sit of the cabinet left it very square.

I used very inexpensive bottom mount drawer slides.  Bottom mounting allowed me to not have to worry about pilot holes on the drawer bodies.  I also built the drawers such that the drawer bodies and drawer faces were independent of one another.  This made the next steps much easier.

I used half overlay European hinges for the cabinet doors.  After installing all the drawers, drawer faces, and doors I carefully aligned them all so that there was 1/16th of an inch between them.

This was important because it allowed me to use the drawers and doors to space off of to install the trim (I spaced the trim 3/32nds from the drawers/doors).

Then I pulled off all the carefully aligned doors and drawers, masked, and painted the trim.  And I painted the drawer faces and doors.  I had to use two layers of primer because the MDF sucked up so much of the primer.  I also applied two layers of paint on top of the primer so as to get an even application.  I used Mythic brand paint which has a very low VOC.  My three-year-old even helped me sand and paint the drawers/doors!

After reinstalling the doors and drawer faces and aligning them all over again... I was done!

Here are some detail shots.


My three-year-old moved his stuff into the cabinet before it was done.  And now that it's complete he loves to climb inside the closet upper!  The closet will be perfect for his little clothes.  And as his clothes get bigger, the upper closet shelf can be removed and the hanger bar can be moved up twelve inches.

Room remodel done.  Whew!  This is now the nicest and most complete room in the house.